
Estimated reading time: 11 minutes
Everyone has that one gun with absolutely zero practical purpose. This working A280-CFE Blaster in 22LR turns an AR-15-based build into a Cassian Andor-inspired space gun that keeps finding its way back into the range bag.
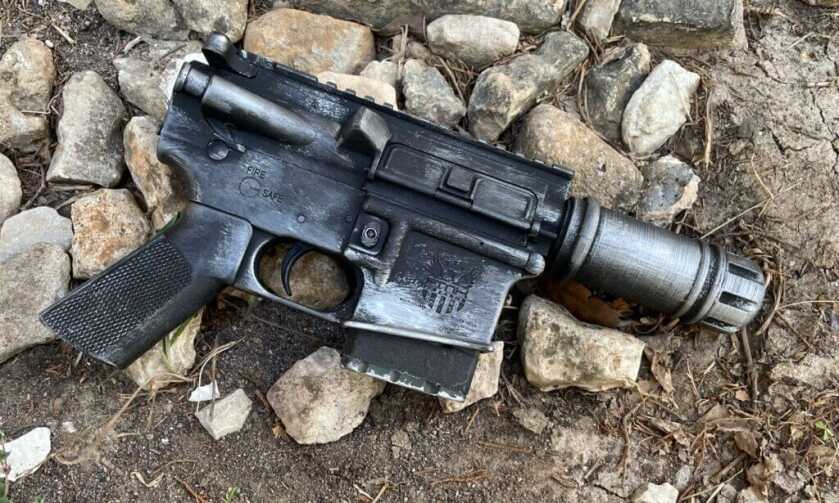
Everyone has that one gun in their safe with absolutely zero practical purpose. For me, that’s my A280-CFE Blaster chambered in 22LR. Read on to see just how easy it is to build your very own functional space gun.
Table of contents
- Why Star Wars Blasters Hit Different for Gun Guys
- The A280-CFE Blaster Hides an AR-15 in Plain Sight
- What You Need for the A280-CFE .22LR Build
- A280-CFE Lower Assembly Drops the Buffer Tube
- The Upper Turns an AR-15 Into a Rogue One Blaster
- Trimming the Magazine Nails the Star Wars Look
- Give the Star Wars Blaster a Battle-Worn Finish
- The .22LR A280-CFE Blaster Steals the Range
Why Star Wars Blasters Hit Different for Gun Guys
One of my favorite parts of the sci-fi movie genre, or just fiction in general, is always the weapons writers come up with. Some iconic examples include Men in Black’s “Noisy Cricket”, a tiny pocket pistol with the power to blow through a wall or to throw the shooter backwards if the recoil is not managed properly. Or perhaps Bilbo Baggins’ short sword, Sting, with its Elven blade that glows when Orcs are near.
Each weapon serves as a tool for the protagonist or as part of the struggle they must overcome. In some cases, the weapon serves as the focal point of the entire plot. Take Star Wars: A New Hope (my personal favorite) and its prequel, Rogue One. The driving force of the films (pun intended) is that the fate of the galaxy rests on the Rebellion’s ability to acquire plans for the Empire’s Death Star and destroy it.
Beyond the Death Star, Star Wars is a treasure trove of sci-fi weapons that any firearms enthusiast would appreciate. This is particularly true because the franchise has a long history of modifying real-world firearms for its props. This contrasts with the eccentric Marvin the Martian-style space guns found in so many other sci-fi-type films. Great examples include the Empire’s E11 blaster and the Rebellion’s DH17, both of which were built using a Sterling SMG as the base. The Stormtrooper’s T21 can be recognized as a Lewis machine gun. And most iconically, Han Solo’s DL-44 as a Mauser C96.
Something about the retrofitted guns adds a bit of fun for gun guys like us. I have always wanted to make a real functioning model of one of these space guns, but getting my hands on a Sterling, Louis, or C96 isn’t the easiest task. Even if I could obtain one, cutting it up is a sin I would not likely commit. Thankfully, the aforementioned Rogue One gave me the perfect blaster to replicate.
The A280-CFE Blaster Hides an AR-15 in Plain Sight
Introducing the A280-CFE Blaster. This Heavy blaster is used by the protagonist, Cassian Andor, as he and others fight to obtain the plans for the Death Star in Star Wars: Rogue One. While the average viewer wouldn’t give this blaster a second look, anyone remotely familiar with firearms would immediately recognize it as a heavily modified AR-15. And an AR-15 is one firearm I have no qualms about butchering for my own cheap entertainment.
What You Need for the A280-CFE .22LR Build
First, you’ll need to acquire all the necessary components. Price was certainly the driving factor for me, so I just got the cheapest version I could find of each component. For this A280-CFE Blaster build, you will need the following.
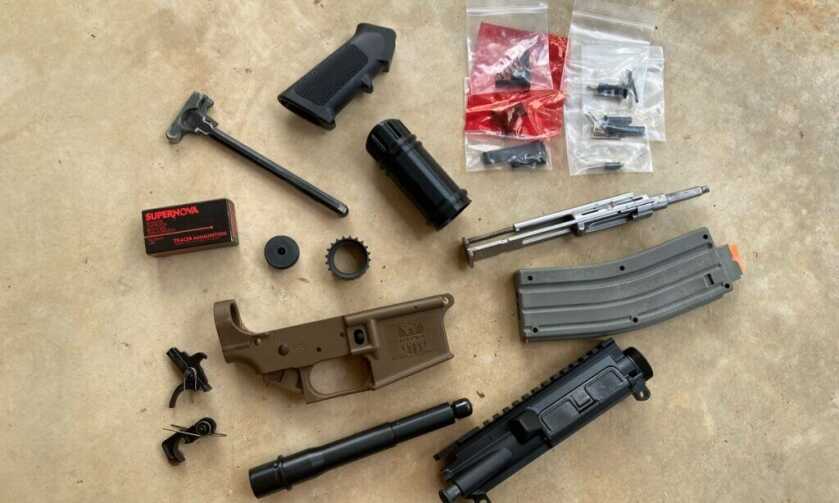
- Lower receiver – The cheapest I could find was polymer, which also helps save weight
- Lower parts kit
- Upper receiver with parts kit
- Charging handle
- Buffer tube blanking plug – these can be bought as Picatinny rail adapters, but I 3D printed mine
- Pistol grip – Use whatever you like, but an A2 was used in the movie
- Barrel – length doesn’t matter, but it helps to have a pistol-length gas port for reference when cutting it to size
- Barrel nut
- 22 conversion BCG – I used a CMMG
- Barrel Shroud – I 3D printed mine, but you could turn one on a lathe if you want to make it really solid.
A280-CFE Lower Assembly Drops the Buffer Tube
Start by assembling your lower with the parts kit. The only ways you deviate from a normal AR build are with the rear takedown pin detent and the buffer tube plug. The buffer tube plug simply screws into the lower where the buffer tube would go to close off the opening. We will not need a buffer, buffer tube, or buffer spring since the recoil spring is built into the conversion bolt.

Not having a buffer tube also means no receiver end plate or castle nut to retain the rear takedown pin detent spring. To work around this, I cut about 3/16” off the spring and threaded an M3*8 Machine Screw into the hole to retain it. The bolt cut its own threads into the polymer, but you would have to tap the hole if you have an aluminum lower. Having the screw retain the spring works well, and it adds to the non-typical look of the pistol.
The Upper Turns an AR-15 Into a Rogue One Blaster
First, you will need to make a barrel shroud. I modeled one in CAD and 3D printed it in PETG. You can download the STL file if you want to print it yourself. The other option would be to pull some favors with your local machinist friend.

STL Files Available Here: Designs – Thrifty_Operator – Thingiverse
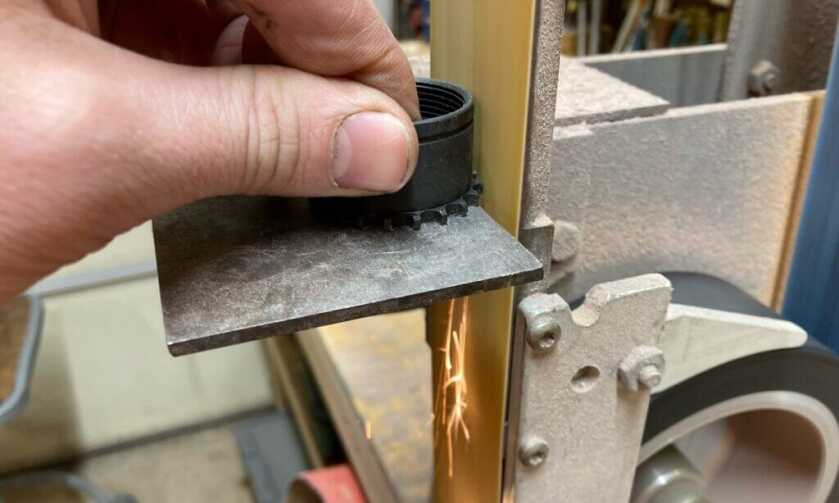
Next, grab your barrel nut and grind all the points flush with the outer wall of the tube. The nut should now fit snugly into the shroud. Make sure it is turned the right way to thread onto the receiver and epoxy it into the shroud. This shroud/nut assembly will hold the barrel secure to the receiver.
Next, take your barrel and cut it down to length. If you cut right through the pistol-length gas port, it ends up being just about right. Next, grind the diameter of the muzzle to about 10mm. This will fit through the end of the barrel shroud. Any additional material removal is not required, but will lighten the end of the pistol. I decided to grind mine in an octagon.

After shaping your barrel, take a bottle of Cold Blue and apply a coat to the bare surfaces. Although it will be covered by the shroud, I still want to protect it from rust as much as possible.

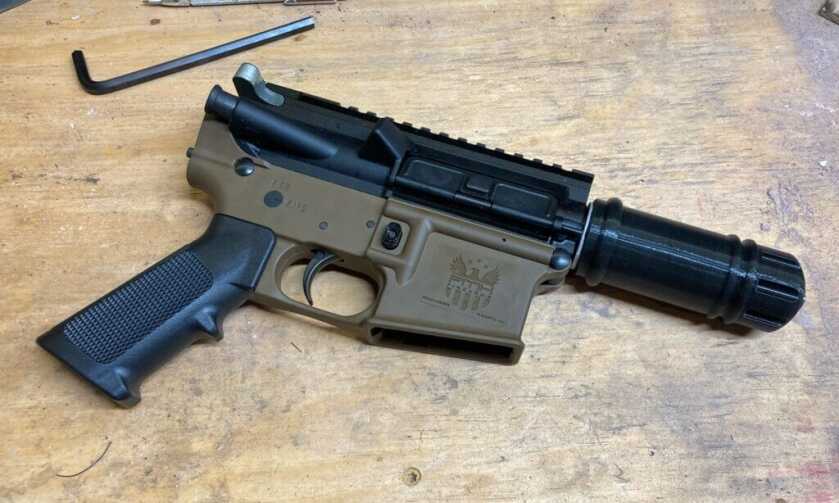
With the shroud nut holding the barrel snugly in place and the upper parts kit fully installed, you can insert your 22 Conversion the same way you would insert a typical bolt carrier group. At this point, the upper can be pinned to the lower, and voila, you have yourself a functioning space blaster.
Trimming the Magazine Nails the Star Wars Look
The 25-round mags that come with the conversion kit don’t quite have the right look for this build, so we will need to shorten them. To do this, remove the baseplate, spring, and follower, then cut the mag to length. Cut a new slot on the inside for the baseplate and trim the spring to length. With only two of the original six bolts left holding it together, you will need to find a way to keep it from popping open. I wrapped the bottom with a bit of gaffer’s tape. It’s crude, but it goes with the worn space blaster look, so I’m cool with it.
One thing to note. While this blaster may have unlimited ammo in the movies, you will only have eight rounds after this modification.
Give the Star Wars Blaster a Battle-Worn Finish
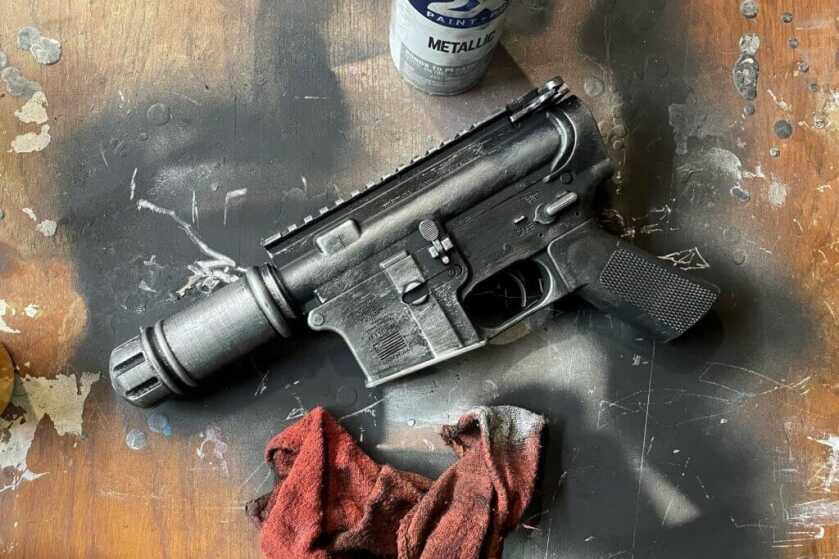
The last box to tick is to make this blaster look battle-worn; the rebellion has very few new blasters after all. To do this, start by giving the entire pistol two coats of metallic silver spray paint. After the silver has fully dried, go over it with a single coat of flat black spray paint. Then, wipe the black away on high-wear surfaces. By rubbing away the black to expose the silver underneath, you give a quick weathered effect.

Repeat the application and removal of paint as needed until you are happy with how it looks. You can even dust it with a bit of sand or dirt while the paint is still tacky if you want it to look really worn in. Just be sure to keep debris out of the magwell and that the dust cover is closed if you go this far.
A280-CFE Blaster Build Specifications
| Model | A280-CFE Blaster |
|---|---|
| Caliber | 22LR |
| Base Platform | AR-15 |
| 22 Conversion BCG | CMMG |
| Barrel Shroud | 3D printed in PETG |
| Muzzle Diameter | about 10mm |
| Rear Takedown Pin Detent Spring | about 3/16” removed |
| Retaining Screw | M3*8 Machine Screw |
| Original Magazine Capacity | 25-round mags |
| Modified Magazine Capacity | eight rounds |
The .22LR A280-CFE Blaster Steals the Range
While I’ve heard the CMMG conversion kits can be temperamental, I have had pretty good luck with it in this build. It actually seems to run better in the blaster than in my normal AR. I get a jam now and then, but for a range toy I don’t mind too much.
Funny enough, this pistol makes it into the bag for most of my range days. Every time I break it out, everyone on the line wants to give it a try. It is a great conversation piece, and with the low cost of 22, I love sharing it with others. I guarantee that if you hand it off to one of your buddies, they will have a smile when they hand it back. It is definitely one of my most fun builds. Now I just need to try it with tracers.
A280-CFE Blaster Pros & Cons: Ridiculous, Fun, Imperfect
- Pros: Instantly recognizable conversation piece, inexpensive 22LR range fun, lighter polymer lower, and one of the author’s most fun builds.
- Cons: Occasional jams, the shortened magazine drops capacity to eight rounds, and the whole thing proudly has absolutely zero practical purpose.
Related Reads from GunsAmerica Digest

Garrett has a wide variety of skills and interests. His profession as an engineer in the steel industry aligns with his active approach to hobbies. Whether going to the gym, shooting, hunting, riding his motorcycle, or just tinkering in the shop, Garrett always strives to be his best.
Experience:
Mechanical Engineer – Supervises a small group of reliability professionals who deliver practical solutions and keep the plant running.
Practical Shooting – Former member of Oklahoma State’s Practical Shooting Team, and continues to hold himself to a high standard in defensive shooting.
Adventurer – Hiking, moto camping, backpacking, hunting, shooting. Life is too short to take it easy. Garrett is always looking for the next opportunity to get outdoors.
id add a tubular dot sight to hit stuff. .06-.10 a round i like to hit stuff. the traders would be fun. rogue 1 and Andor are my favorite star wars. k2so freaking wins on personality and attitude.