SERIES
Part 1: Want to Reload Your Own Ammo? Basic Questions to Consider
Part 2: The Reloading Process
Part 3: The Gear You’ll Need and What It’ll Cost You
Part 4: Brass Cleaning and Preparation to Load
Part 5: Brass Resizing
Part 6: Trimming Cartridge Cases
Part 7: Repriming the Cartridge Case
Part 8: Powder, Propellants, and Pressure
Part 9: All About Primers
Part 10: Projectiles: Materials, Weights, and Styles
Part 11: Seating and Crimping Bullets
Part 12: To Crimp or not to Crimp
Part 13: Final Inspection and Packaging Tips
The next step in the process and one that must be completed before adding new power and seating a bullet is re-priming the cartridge case. It’s kind of important, mainly because if you don’t add a new primer before charging with powder, the powder will dribble out the bottom. Well, that and the cartridge won’t go bang.
Primers are small metal cups that can be pressed into the hollowed out primer pocket in the base of the cartridge case. On the inside of the primer cup is a magic compound that explodes when impacted with vigor and enthusiasm. The idea is that the firing pin whacks the bottom of a fresh primer, thereby blowing up that tiny bit of compound. The flame from this mini explosion travels through the primer flash hole into the main cartridge case body, thereby igniting the powder charge. As you might imagine, primers are a one-time use thing, so you have to insert a brand new one every time you reload a cartridge. Fortunately, they’re cheap, usually running about three cents each give or take.
In this week’s installment of the GunsAmerica Reloading Series, we’re going to take a look at the re-priming process and offer a look at the different ways you can do it.
Before we get started, I should reinforce the importance of using the exact components specified in your reloading manual recipe. While all primers of a given type, like Small Pistol, for example, may look the same, they’re not. Reloading manuals will almost always specify a primer brand for each load. Different makes of primers ignite with slightly different characteristics so Hulka Primer Company Small Pistol primers might generate different pressures than Cleetus’s Primer and Bait Company Small Pistol primers. Until you learn the nitty gritty technical stuff, follow the recipes exactly.
But Wait! Watch Out For Crimped Primer Pockets
If you’re reloading adopted or experienced brass cartridge cases, you will eventually run into a little gotcha – crimped primer pockets. Crimped pockets are commonly seen with popular military calibers like .223/5.56mm and 7.62x51mm/.308. Manufacturers will “mash in” the edges of the primer pocket towards the primer itself to secure the primer in place. The end result for you is that the opening of the primer pocket in the cartridge case will be a little smaller than you like, even after punching the used one out. The folks who originally made your cartridge cared more about primer security than your reloading convenience, so you can consider this little problem one of the costs of “free” brass picked up from the range. You might also see crimped primer pockets in lots of once-fired brass that you purchase.
Over time, you’ll learn which brass manufacturers crimp primer pockets, so that’s one way to spot these cases. You’ll also find out when trying to seat a new primer using any of the methods we’ll get to below. The primer won’t want to go in. If you feel a lot of resistance, don’t force it. Remember, primers are meant to explode when impacted and you really don’t want to start a chain reaction of little explosions on your reloading bench as that makes you look like a noob. Besides, it’s hard to explain to your family members.
If you do run into a crimped primer pocket, it’s no big deal to set things straight. There are a variety of tools that either cut or press those crimped edges out of the way, thereby restoring the primer pocket to a reloading-friendly size. We’ll cover primer pocket cutting, sizing, uniforming, and swaging in a separate article later in the series. If you don’t have knowledge or tools right now, just toss these cases into a bucket for use down the road.
Single-stage Reloading Press Priming
Since you have to have at least a single-stage reloading press to reload anything, it’s a handy thing that many (or even most) presses have a built in way to seat primers. It’s not a technically difficult operation after all. You’re just pushing a new primer into the pocket. It’s held in place by friction so all you need is a tool that provides a little bit of mechanical advantage.
[one_half]

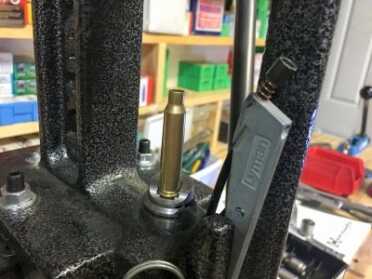
This Lyman Crusher II single-stage press has a priming arm that places a fresh primer under the cartridge case on the down stroke.
[/one_half]
[one_half_last]
[/one_half_last]
Let’s consider Lyman’s Crusher II single-stage reloading press as an example. This model has a priming arm hinged at the bottom. The top of the arm has a cup that holds a single primer. The ram of the reloading press has a slot into which the arm can swivel, thereby placing the primer directly under the cartridge case. As you lower the ram you push the priming arm into the groove in the ram and the case lowers onto the new primer. The mechanical advantage of the press provides the muscle to push the primer into the cartridge case. To make things a little more efficient, many presses allow attachment of a primer tube. Each time you move the priming arm back and forth, the arm picks up a fresh primer from the tube so it can be placed into the path of the descending cartridge case.
This method works and is basically free as you already have to buy a reloading press. When shopping for a single-stage press, it’s a feature worth considering if you’re trying to keep your startup costs to a bare minimum.
On the negative side, it’s kind of tedious. Or maybe I’m just utterly impatient. As a result, I never use this method anymore, but lots of folks swear by it, so don’t let my need for immediate priming gratification sway you away from this straightforward approach.
Progressive Reloading Press Priming
We’re going to be brief here because if you already have a progressive reloading press, you’re likely ahead of the scope of this article already. For those of you not familiar, a progressive reloading press performs several steps of the reloading process each time you crank the lever. For example, my Hornady Lock and Load AP, when set up for pistol cartridges, does the following with each full cycle of the handle:
- Decaps a cartridge case (punches the old primer out)
- Resizes a cartridge case
- Inserts a new primer
- Bells the case mouth, expanding it just big enough to seat a bullet
- Drops the correct powder charge into the empty case
- Seats a new bullet to the correct depth
- Crimps the case with either a roll or taper crimp depending on the specific caliber
Most progressive presses use a tube feed system. After loading a box of 100 primers into the tube, the priming mechanism pushes one at a time out the bottom of the feed tube and aligns it with an incoming cartridge case. As the shell plate of the press descends, it lowers a freshly resized and deprimed case onto this new primer, seating it in place. The press then rotates the primed case to the powder drop station. While there are slight differences between different makes and models of progressive reloading presses, that’s the general idea.
When using a progressive press, I usually, but not always, use the priming system that’s built in. I’ll explain why sometimes I still prime with a hand tool in a minute.
Dedicated Priming Tools
There are a number of types of dedicated priming tools on the market. The most common design is the hand primer. It’s a little bit like a pair of pliers in that a squeeze pushes a new primer into place. Hand tools usually have a tray attached where you dump a box of primers. The trays are usually textured with ridges, so as you swirl the tray around, the primers tend to flip themselves to the correct orientation where the flat side of the cup is on the bottom. This is important as you don’t want to be handling primers with your fingers. It’s good form not to get oil and grime from your fingers on the primers.
Since the primers on the tray are facing up, you place the cartridge case in the priming tool also facing up. The squeeze drives a piston upward, pushing the primer into the case. This process relies on something holding the cartridge case firmly in place, and this is where designs vary a bit. Some hand priming tools use specific shell holders for each caliber you’re going to prime, so be sure to order the right holders if you choose this route. Others use a universal approach with “jaws” that clamp around almost all cartridge case types, centering it over the priming piston automatically.
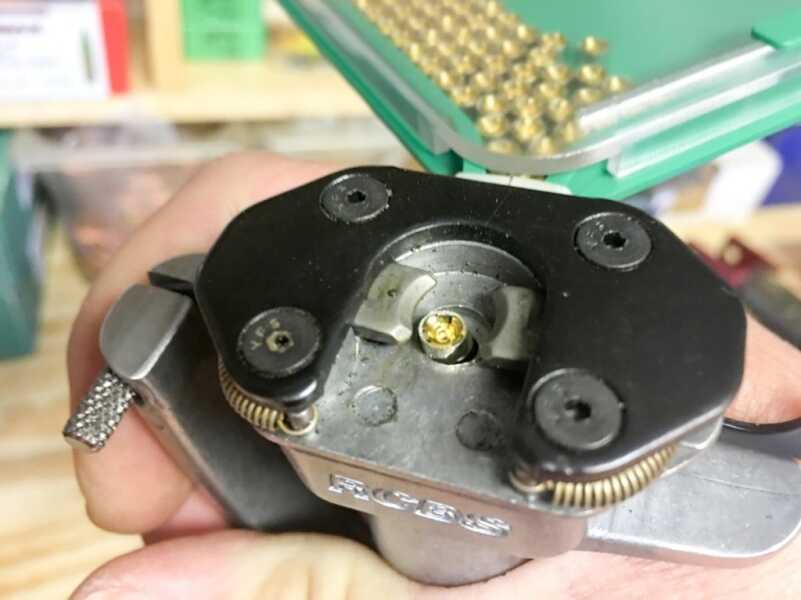
The squeeze action of hand priming tools drives a piston up towards the primer pocket of a cartridge case.
I have to put in a plug for RCBS here. I’ve used all the hand priming tools at one point or another, and the RCBS Universal Hand Priming Tool is by far my favorite. I’ll tell you why because it might shed some light on features that you’ll appreciate over time. The grips are contoured and comfortable. After inserting hundreds of primers in a sitting, your hands will feel the difference. If course with any hand priming tool, you’re going to develop crushing handshake strength, so you might as well not get blisters doing it. The grips are also made of metal. I’ve broken a number of hand primers that use plastic components. The universal shell holder is spring loaded and fits just about every rifle or pistol case out there so you don’t need to buy and swap shell holders, just shove a case in and the “jaws” center it and hold it securely in place while you drive a primer into place. The tray is square. This means you can set it upside down over an entire box of primers and flip the whole mess over so all primers land on the tray without spillage. Models with round primer trays are annoying as you will absolutely, positively, spill primers because the round tray fails to cover the entire primer box. It’s also designed to separate the waiting primers in the tray from the one being seated to minimize the risk of a primer chain reaction upsetting any nearby neighbors. Oh, and the disclaimer. This was not a freebie from RCBS. It was bought and paid for with real money and well worth the expense. It’s the only one I use now. Plug over.
[one_half]
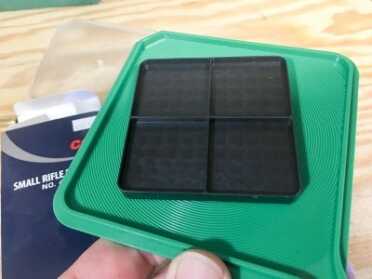
Hand tools with large square trays allow you to flip an entire tray of primers into place without spillage.
[/one_half]
[one_half_last]
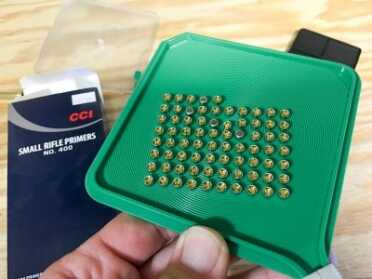
When you flip a tray of primers into the hand tool tray, some will be right side up and others will be upside down.
[/one_half_last]
Bonus Tip: When using a hand primer, always do two things. First, wear safety glasses. Remember, primers are built to explode with impact, so it’s possible that the act of driving a primer into a cartridge case can make it go bang. In fact, it’s possible that one primer going off might ignite others nearby, setting off a little bit of a chain reaction. I’ve not had that happen, but it can, so wear the glasses. Second, make sure the open case mouth faces away from your face when you insert primers with the hand tool. This is easy and after a few hundred primings, it will become a habit. Do this for the same reason as wearing glasses. Even with eye protection, you don’t want a primer igniting towards your face.

The feeding tray of hand priming tools has ridges so a gentle “swirl” will cause the primers to orient bottom down so they’re ready to feed.
I’m a big fan of hand priming tools, especially if you reload using a single-stage press. You can crank through hundreds, and even thousands, of cases in no time. Since it’s portable, you don’t need to hibernate at the reloading bench if you don’t want to. I also like the “feel” of the process. Since I’m priming with hand pressure I can easily sense when something isn’t right.
One other benefit of hand tools is that if you encounter a crimped primer pocket, you can feel the resistance right away and easily set that case aside without disrupting your process. Sometimes, if that happens with a progressive press you can foul up the flow enough to bring your process to a grinding halt while you remove the offending case and get things back in order. For this reason, I’ll sometimes use a hand primer to process large batches of .223 or .308 brass even if I am reloading them with a progressive press. It’s much easier to deal with the occasional crimped primer pocket that sneaks into my incoming bucket of brass with the hand primer.
You’ll also find some bench priming tools on the market. Rather than use a hand squeeze mechanism, they’ll rely on a lever to create the mechanical advantage to press the primer in place. The process is somewhat like that of using a priming mechanism on a single-stage press.
Summing It Up
If you’re just getting started with reloading and plan to do volume in the hundreds (or even thousands) per month, it’s hard to go wrong investing in a good hand priming tool. It’s one of those tools that you’ll likely use forever, even if you do upgrade to a progressive reloading press at some point.


Hi: I’ve been reloading for over 50 years, it’s all been OK so far, until I bought an AR-15, .223. My reloading press has a spring loaded priming arm with a large rifle, spring loaded primer head. The .223 uses small rifle primers and my current large rifle priming tool doesn’t center the smaller primer, so my question is, do they make an replaceable, small rifle priming tool that will work with my reloading press? Thx
i started loading about 50 years ago (i am 72) and then took up a job which kept me away from reloading for about 30 years. i own a .44 ruger super blackhawk magnum. when i started reloading again i use H-110/w-296 powder and with those powders you are required to use magnum primers. i had forgotten about that and used standard primers. this was a huge mistake because standards will not work with those two powders. the result was a cast bullet stuck in the bore of my .44. this is not good! if i had not realized something was wrong and fired another round that would have ignited properly it would have blown up my gun and possibly my hand, head etc.
loading some pistol powders like bullseye it is possible to put a double charge into one case. i used to double charge one case and put it into the loading block and at the end of charging the cases i have always turned up the full loading block and visibly check the cases to make sure i have not missed one which has happened and also to make sure i haven’t put a double charge into one case. this is very easy to spot when loading .357 and .44 ammo. most loads will not have room for a double charge but beware when loading hand gun ammo.
LOADING 45’S YOU NOW HAVE TO TAKE INTO CONSIDERATION THE PRIMMER CASE POCKET SIZE.
FOR MANY YEARS 45’S WERE ALWAYS LOADED WITH A LARGE PISTOL PRIMMER BUT NOW SOME AMMO MANUFACTURING HAVE CHANGED TO A SMALL PISTOL PRIMMER (TO SAVE MONEY) AND EVERY CASE HAS TO BE CHECKED AND SEPARATED BY THE SMALL/LARGE CASE PRIMMER SIZE POCKET BEFORE YOU START TO RELOAD THESE 45’S. FAILING TO DO THIS CAN BE VERY DANGEROUS BECAUSE IF YOU ARE LOADING LARGE PISTOL PRIMMER’S AND INSERT A CASE WITH A SMALL PISTOL PRIMMER POCKET THE PRIMMER BEING LOADER WILL NOT FIT AND CAN GO OFF IF FORCED.
ON THE OTHER HAND IF YOU ARE LOADING SMALL PISTOL PRIMMER’S IN SMALL 45 PRIMMER CASES AND A LARGE PRIMMER CASE IS LOADED THE SMALL PRIMMER WILL NOT LOAD AND IF YOU ADD POWDER TO THAT CASE AS THE NEXT STEP THE POWDER WILL ESCAPE AND MAKE A MESS. BUT AT THE VERY LEAST WILL NOT GO OFF OR EXPLODE
SO BE CAREFUL AND ALWAY PAY ATTENTION TO THE ABOVE INFO.
STEVE
I started reloading back in 1963 on an Army base in Germany at the Gun Club. 53 years later I’m still learning.
One question I have is where to get CCI primers in the APS strips other than mail order from the “big 3 suppliers” I’d like to buy locally and avoid the HAZMAT fee. I have several of the “big box” sports stores nearby but they don’t carry them even though I have put in requests. I tried to contact the CCI rep for my area (Central Ohio) with no luck. Do you have contact info for him/her?
Just buy the primers and then get the RCBS tray and strips separately and load your own. Don’t worry about the different colors as I feel it is not a good idea to load a mess of strips and then leave them in the strips. I have the yellow(small) and blue(large) strips and only load as many primers as I need.
I have a question related to long term storage of ammo, in the event that I wish to reload and store ammo. Obviously, while keeping the ammo dry, is there any kind of shelf life for gunpowder and primers?
While I can’t give a number, because it depends on storage conditions, I do know that if kept clean, cool, and dry, we’re talking decades. I regularly shoot surplus ammunition made in the 1940s. Can’t offer any personal experience on components like primers and powder though. Perhaps some other readers can chime in?
One other thing to be aware of is that powder lots change over time, so Powder XYZ made one year may not be identical some years down the road, so I wouldn’t rely on old, stored powder to develop loads close to maximum.
You missed one important point. The different types of primers, i.e. small pistol, large pistol, small rifle, large rifle, shotgun and magnum primers. It is easy to put the wrong primer in a given caliber.
You are exactly right, and that’s a point that can’t be overemphasized. I touched on it at the beginning, “Before we get started, I should reinforce the importance of using the exact components specified in your reloading manual recipe. While all primers of a given type, like Small Pistol, for example, may look the same, they’re not.”
But as you say, the similar types can fit in the wrong cartridge! There’a another article already in the queue that goes into lots of depth about the various primer types, and I hit the size topic pretty heavily there.
Thanks for calling this out – safety first!