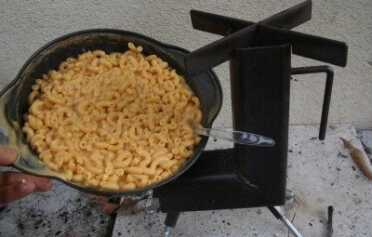
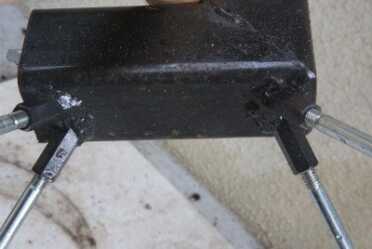
This is the DIY rocket stove I got on Ebay. There are a ton of different sizes, and I found that this size works great.
Resources:
Test Stove Seller on Ebay
Larger Models DIY
Rocket Stoves on Etsy
Valley Food Storage (the Cheesy Mac we cooked)
I love finding useful things that handy people can make themselves, and that the rest of us can buy cheap. If you follow this column, you already know that I fell in love with the StoveTec “Rocket Stove.” I still see them from $75 to $150 on Ebay all the time, and as a stay at home stove, I don’t think you can beat it. But as I discussed last week in my overview of bugout bags, if you are stuck on the road, the StoveTec is just too big and heavy. I have been on a quest for some time for a smaller, lighter, more portable contraption that does the same thing as my StoveTec. Right now I have a few products on the way, but in the meantime, I’d like to share a cool stove I got a few months ago that I just tried last week. It is made from square tubular steel, and the guy who makes them on Ebay adds legs, as well as a baffle, so that the stove burns reliably.
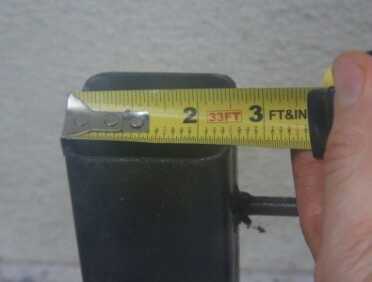
The maker of these stoves seems to be going with 3″ stock now, but my stove is a 2 1/2″ so that is what I tested.
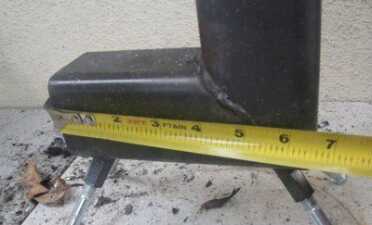
This particular stove is 2 1/2″ wide, and the guy who makes them seems to have moved up to 3″ for some reason. If you are going to use the pictures here to try to make one yourself, it could be that the burn chamber at 3″ will bring enough BTUs to speed up the cooking process some. The advantage of a small stove is that you can capture as many BTUs as possible from limited fuel, and the smaller the stove, the lower the weight. This stove as shown weights about 5 1/2 lbs. There are dozens of other sizes I have seen on both Ebay and Etsy, but I can’t comment on their draft properties from actual experience. I left my grinder chop saw behind in my last move so I have to settle for what I can buy out there right now. This stove was slow to cook a package of freeze dried survival food to done with just some sticks and leaves, but you know what, it works. And because it is mostly heavy gauge steel, I feel like I could cook on this stove every night indefinitely. As you can see from my pics, I had left this stove outside under a table and it rusted some. Who cares? I don’t. Eventually all steel that you burn something in rusts anyway. The stove works great, and I think the small size is perfect for hydrating pasta, rice, and freeze dried foods, because it is not likely that they will burn.
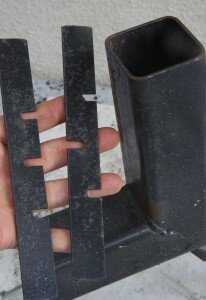
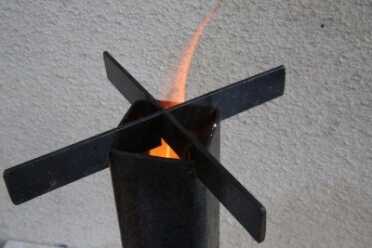
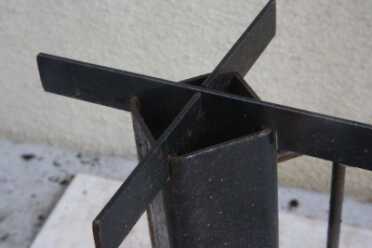
There are a lot of different approaches to the grate. This is the simplest, and it makes the stove much more portable.
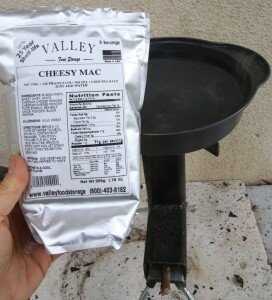
My experiment was to cook the Valley Food Cheesy Mac package that I noted in last week’s article was blown up a little. All of their stuff is washed with nitrogen as it is sealed up, so I knew that if any reaction was going on, it was minor. Oxygen is the culprit in most of the break down of survival foods, and their approach, rather than use an oxy absorber, is to flood in nitrogen instead, much the same way as you would use argon if you were to make this stove with a Mig welder.
I always try to measure a worst case scenario if I can, so instead of an actual covered pot, I elected to use a steel cakepan. It will fit in a backpack a lot easier than a pot and lid, and it is thin and light. The Cheesy Mac took about 20 minutes to come to a slow bubble boil, and then it was easy to maintain the boil with the stove. Overall it was cooked in about 45 minutes.
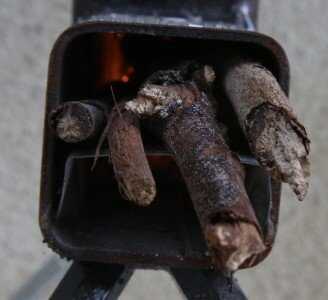
Don’t be shy with a rocket stove, especially one as small as this. Once the fire is going, assuming you have a good baffle for air, feed sticks and leaves down from the top and get a small “raging” fire going to bring your stuff up to cooking temp. The bottom of the pan is going to be loaded with creosote anyway, so don’t worry about flames licking the bottom. The directions for this 2 1/2″ stove said to use sticks about pencil thin, but I used slightly smaller and slightly larger both down the top and through the fuel chute just fine.
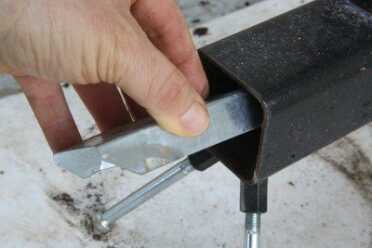
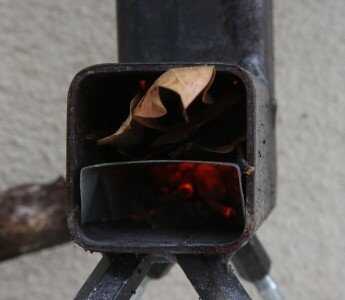
All rocket stoves need a baffle of some kind to give the bottom of the fire oxygen. This stove uses a bent piece of galvanized steel. It is the only part that you might want two of, because eventually it would theoretically rust and thin. Er, prob not.
As with all survival materials, the important thing is that you buy or make a stove now, and use it before you need it. If you never thought you could cook dinner on a handful of sticks and leaves, any working Rocket Stove is going to shock you. But if you are one of those people who thinks that if you pay $50 or $100 for a camp stove it better darn well cook as good as your Coleman propane stove, think again. There aren’t a ton of BTUs trapped inside old dry sticks from the ground, and less from leaves. But they will cook you dinner…for the rest of your life in one of these cheap little stoves.
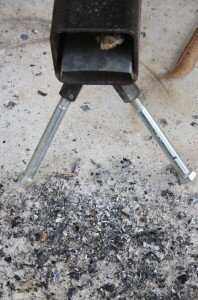
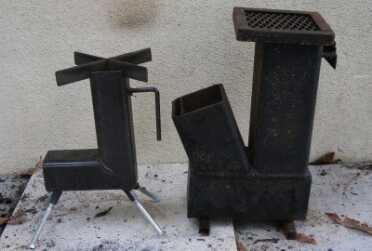
I have a couple more backpack style stoves with thinner metal coming soon, and I’ll get right on testing them for you, but if you have a chop saw and a Harbor Freight $100 Mig welder, you can make one of these for a few bucks. Your local steel shop will make you one for $20 if you show them this article as well. And as you can see from the side by side picture I’ll include here, they go right up to 4″ which yes, I’ll also be testing soon on group size food pots. If you are a family of only several, and you took my advice for storing buckets of beans, rice, and pasta, this stove is all you need, and though you could go thinner and lighter, it won’t last as long or take a hit like this size will. The legs are up to you of course, but they do come off, and the clearance is nice. I suspect that any dimensions will work, as long as you have a baffle. Get clicking! Time is possibly getting short.


Ughhhh, I’m *genuinely* hoping that the mention of “$100 **MIG** welder from HarborF” in this article from 2015 was simply an “overly optimistic ballpark-ing estimate” and not some unpleasant reminder-hint about how trivial my start-up costs might have been if my present-day devotedly keen pursuit towards proficient welding had manifested itself into existence a few years earlier instead… Granted, I don’t actually care to find out via my own due diligence (or on the off-chance of this being read + replied to) just bc I’m well aware of the severe thrashing one’s mental health can take when harnessing the power of the internet to peer into the recent past once the nebulous “removed enough” threshold of time has elapsed… I’m plenty talented at injecting utter despair into my head all on my own tyvm, lol
Interesting project, I\’ll definitely try and make something like this myself. Thanks for the article, keep up the awesome blog!
Msg to admin and/or Paul Helinski
I just want to say thank you for writing and printing all these posts. I started reading a year or so ago and have gone back and read everything you posted often multiple times I am grateful to have someone that spends the time to try to educate individuals out there such as you do Regardless of all the negative comments posted, there are so many more that are positive and I think these articles are awesome. I think that for someone that can’t or doesn’t have the ability to test lots of different items such as you do it’s a great resource and for those that have the time to research and or test objects then it’s great to stimulate thought and conversation I personally use them as a jumping off point to then go and do more research on the different subjects that you provide as I am unable to physically test most of these, so I have to rely on multiple opinions of others whether positive, negative or indifferent. Feedback is often helpful to see the pros and cons list by others so that I can research both sides to see who knows what they’re talking about and who doesn’t and stimulate thought for the opposite side of the proverbial coin I have learned a great deal by reading your articles and then even more by using them as reference points to increase my knowledge in other areas Again I just want to say thank you for writing these and I look forward to many more to come in the future
That’s exactly the purpose of these articles Kurt. Nobody has the same priorities, budget, locational issues, etc. But I think most of the prepping and survival materials out there are more concerned about connecting with what people think they need (guns, bugout supplies) and potential advertisers rather than the issues that we all should be researching to apply our budgets to our case. This is supposed to be about actual survival after an infrastructure collapse. I wish more people who have the resources to test things would help more than they do.
Might try this with black water pipe. A no weld version, just screw it together. Will have to figure out a grate or maybe an expansion fitting with holes drilled.
I like the “v” idea for the main body, so the fuel slides into the burn area. I’d also like to suggest a modification: a square of steel cut out of the side of the combustion chamber and replaced with a same size square of expanded steel. This would supply plenty of air while negating the fuel clogging the airway, or the need for that silly little baffle. Comments? Love to hear some critique before I build. Thanks!
Thanks for the article–I never thought about making the stove out of tube stock. It’s a very efficient design that could be infinitely modified for specific purposes. I’ve made temporary stoves like this out of rocks and an old grill grate. Allows you to add fuel without removing the pot/grate.
Personally I would not use galvanized steel in direct contact with an open flame. The zinc coating will burn and give off poisonous fumes. Better to use a small piece of stainless steel
As for the smaller one, just angle the main body into a “V” shape and turn the top level for the pot support.
It will be the same size, will act more like a self feed fuel area, and will weigh the same.
Just carry a small steel or cast iron grate with you.
A small depression or a ring of stones is your stove.
You can cook your taters wrapped in foil in it, your ear of corn with husk on in it, and your meat, soup, or coffee om top of it.
45 mins to boil water and make mac and cheese, this is NOT a rocket stove: Rocket stoves heat up quickly and put out a lot of heat quickly and are able to use small twigs as fuel. They do it by getting very hot inside and having a longer burn chamber enabling them to burn the exhaust gases as well as the fuel getting the extra heat. It also creates a strong draft up the vertical tube “once the fire gets going” that you can cram the feed tube full of fuel, “no need for a baffle” and making the exhaust/cooking area look like a rocket, thus its name. I would also like to echo the warning of using galvanised metal in a stove as the galvanized coating cooks off and the fumes are toxic. Also i’m not sure but it looks like the pot supports might not leave enough clearance between the top of the stove and your pot to allow enough airflow to keep the stove rocketing but I can’t be sure just from photos.
It sounds like from the article that he was trying to find a small portable stove that could use any trigs, sticks, or leaves you can find for fuel and if that’s the criteria you would be better off with Emberlit stove or and other wood burning pocket stove, and there are a ton on ebay just make sure its NOT make with galvanized steel.
Ryan N.
I love these comments that have no basis in actual experience or knowledge. So genius, what gas in the “exhaust gases” actually burns?
Check out the history on wood gasifiers, used in Europe during fuel shortages in the world wars to run gasoline engines.
When white smoke is coming out of wood fuel it is largely water vapor and combustible gasses, a fire that is hot enough with the right o2 mix can ignite the gasses.
I’m not going to dickishly presume yours doesn’t get hot enough as I haven’t held it or tested it myself. I think this would be best in a supply cache or BOL, any steel I hump in the woods cuts or goes bang, jmho.
I third the GA poisoning, welders prep galv plates for a good reason. Remake one with an angle iron, untreated, before you feed your loved ones. Sincere concern for what it is worth. Thanks for the article.
I am going to weld one up for when TSHTF. It is a fine article and I have built several like this as experiments. You can’t have too many emergency stoves because the fuel may not be around for some of them. I can always find a little brush for fuel. Good article.
Reminds me of a technique to have a hidden fire in the woods. Dig a tunnel and use the middle area for your wood or burning materials. Works great if you don’t want to be seen but there is still the smell but it allows plenty of air and burns great.
God Bless the USA!
Assuming you will be washing your dishes at the end of the meal, an easy and old tried and true method of open fire cooking involves using any kind of liquid soap to coat the outside of your cooking pots prior to using them. I realize that in a survivalist mode you may not have access to Dawn liquid at your neighborhood grocery store but you can find recipes to make your own soap and it is easy to liquify it once it is made. The soap coating doesn’t burn off and it traps the soot and creosote before it reaches the hard surface of the pan or pot thereby making it a simple water removal process. We used this technique for many years that I have camped and guided in the Quetico back in the day. It is full proof and cheap and a simple step that will save much time and energy trying to scrub an open fire pot clean.
Noooo! Galvanized baffle w / flames = Galvanized poisoning! Don’t use it! G.V. poisoning never goes away. Ask any real Welder. Danger!
Who would pack a 6lb stove with a 2 lb cake pan? Nobody! I can’t see a practical use for a stove like this at all. no one would take this backpacking, and if car camping you could use a much better, faster stove. who wants to take 45 minutes just to cook mac n cheese?
If you have nothing better to do around the house and want to waste some time…. maybe. In the time it takes you to make 1 pack of cheesy mac, I could cook dinner, eat, & clean up dishes, set up tent, and start a campfire and then take a nap.
if you want to use sticks and leaves, just put a grate over your campfire, just as fast and way lighter to carry.
maybe the next article we will learn how to pack a stove made from stacked bricks, who doesnt have room for 8-10 bricks in their pack and it too can boil water in 20 minutes. And this was your choice because your other stove is too heavy? You obviously don’t hike, you’d be better off with a coleman 2 burner stove while sitting in the campground next to your car. while your taking 45 minutes to cook mac n cheese, the wife will have time to drive to town and get burger king to go with your side dish, shoot, she could probably drive home and make dinner and be back before your mac n cheese is ready. this stove is useless in the real world, No Hiker would carry it, and car campers would use something faster and easier. if you like this sticks and leaves method, get a kelly kettle, Large one is less than 2.5 lbs. and will boil much faster. I’ll stick to my diy alcohol stoves, weighs 7 grams and boils water in 5 minutes. 7 grams vs. 7 lbs……. which would you rather carry on your back?
Its a survival article. Where are you going to get your alcohol? You probably didn’t read the rocket stove survival still article lol. I love these comments that have nothing to do with the subject at hand.
Who would pack a 6lb stove with a 2 lb cake pan? Nobody! I can’t see a practical use for a stove like this at all. no one would take this backpacking, and if car camping you could use a much better, faster stove. who wants to take 45 minutes just to cook mac n cheese?
If you have nothing better to do around the house and want to waste some time…. maybe. In the time it takes you to make 1 pack of cheesy mac, I could cook dinner, eat, & clean up dishes, set up tent, and start a campfire and then take a nap.
if you want to use sticks and leaves, just put a grate over your campfire, just as fast and way lighter to carry.
maybe the next article we will learn how to pack a stove made from stacked bricks, who doesnt have room for 8-10 bricks in their pack and it too can boil water in 20 minutes. And this was your choice because your other stove is too heavy? You obviously don’t hike, you’d be better off with a coleman 2 burner stove while sitting in the campground next to your car. while your taking 45 minutes to cook mac n cheese, the wife will have time to drive to town and get burger king to go with your side dish, shoot, she could probably drive home and make dinner and be back before your mac n cheese is ready. this stove is useless in the real world, No Hiker would carry it, and car campers would use something faster and easier. if you like this sticks and leaves method, get a kelly kettle, Large one is less than 2.5 lbs. and will boil much faster. I’ll stick to my diy alcohol stoves, weighs 7 grams and boils water in 5 minutes. 7 grams vs. 7 lbs……. which would you rather carry on your back?
Something like this is not going to be used a lot. Maybe emergencies and overnight camping trips. A coffee can hobo stove would do just as well, maybe better. I have done my share of camping. If I am using a vehicle and/or a canoe to get to the campsite I have always been able to bring a Coleman stove.
How to make a hobo stove
https://www.youtube.com/watch?v=JkASPgmjRq8
I have a “charcoal chimney” I bought at Wal*Mart a few years ago for $5 because I am too cheap to buy lighter fluid. It makes an excellent stove. It’s also light weight and if I fill it up with other stuff that will have to go in my pack, it won’t waste much space. It even has a handle!
What is the “L” shaped rod on the right side of the stove, it is easily viewed in the last pic. Thanks. Ron
just a welded on handle to dump out the ashes