Updates to this article which was originally published in November of 2022:
October 7th 2024 – Added Aero Precision MOD 4 and BCM MCMR
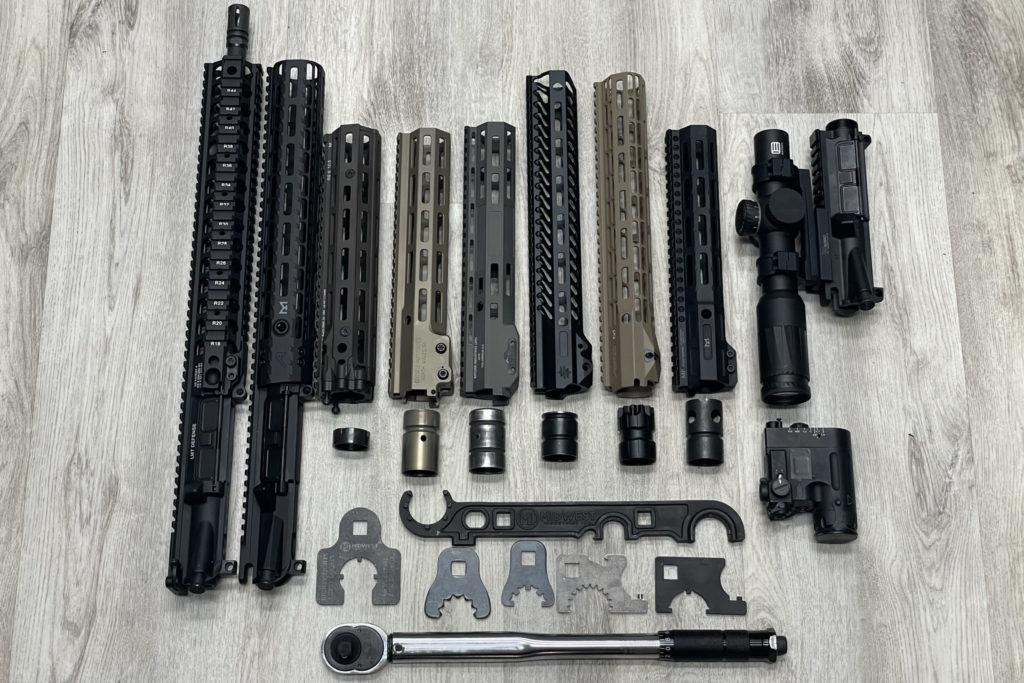
With the increased popularity of shooting with night vision and IR lasers, more companies have started to market their rails as more “rigid” and robust. Why does this matter? In some cases, it doesn’t matter at all. If you only have a primary optic such as a scope or red dot paired with a weapon light, rail rigidity plays no part in giving you a more effective platform. If the rail bends, this does not affect your scope, and your light will still be pointing down range to illuminate all that matters. However, for those who use a rail-mounted front sight or a visible/IR laser attached to a rail, rigidity and return to zero play a huge factor in getting accurate shot placement down range. I found that shifts of up to 15MOA occurred for some rails when loads were applied that simulate laying prone and using a bipod. So what works, what’s acceptable, what mitigates deflection, and what’s affordable? Let’s dig in and find out.
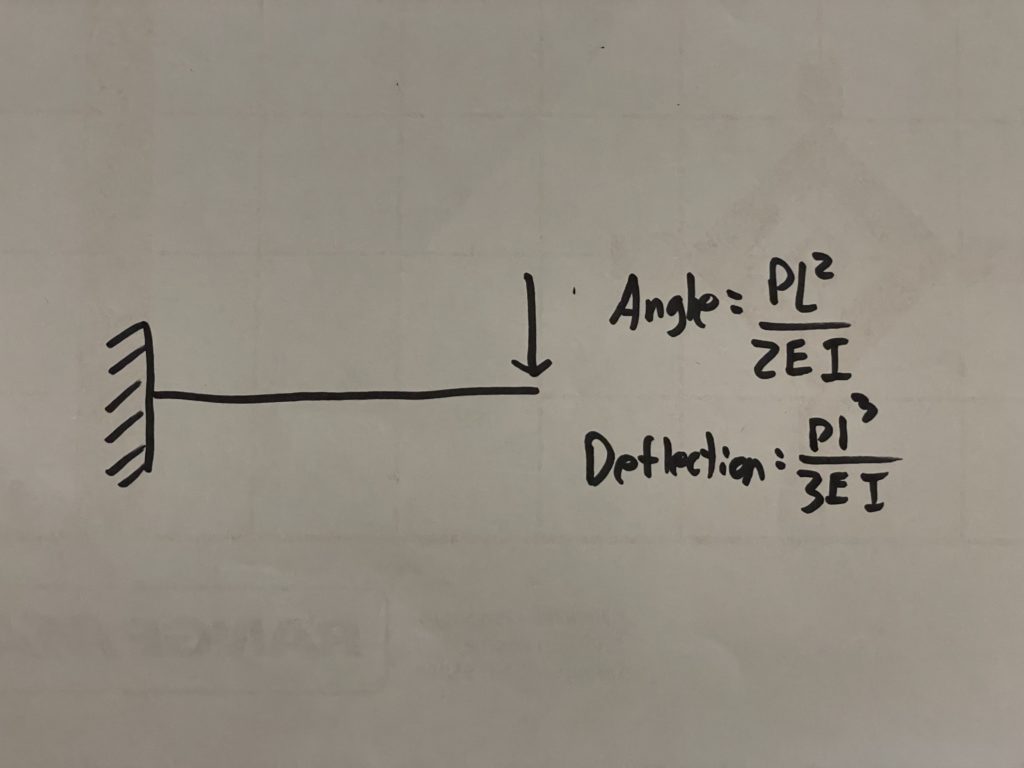
The main portion of my test revolves around bending. I aimed to use each rail as a simple cantilever beam and measure slope or MOA shift caused by deflection when the rails were identically loaded. For you other engineers out there, cantilever beams are a throwback to static’s. A cantilever beam is simply a projecting member that is supported only at one end. To make things simple and consistent, I applied a point load (25.04lbs) at rail slot T40 on each rail.
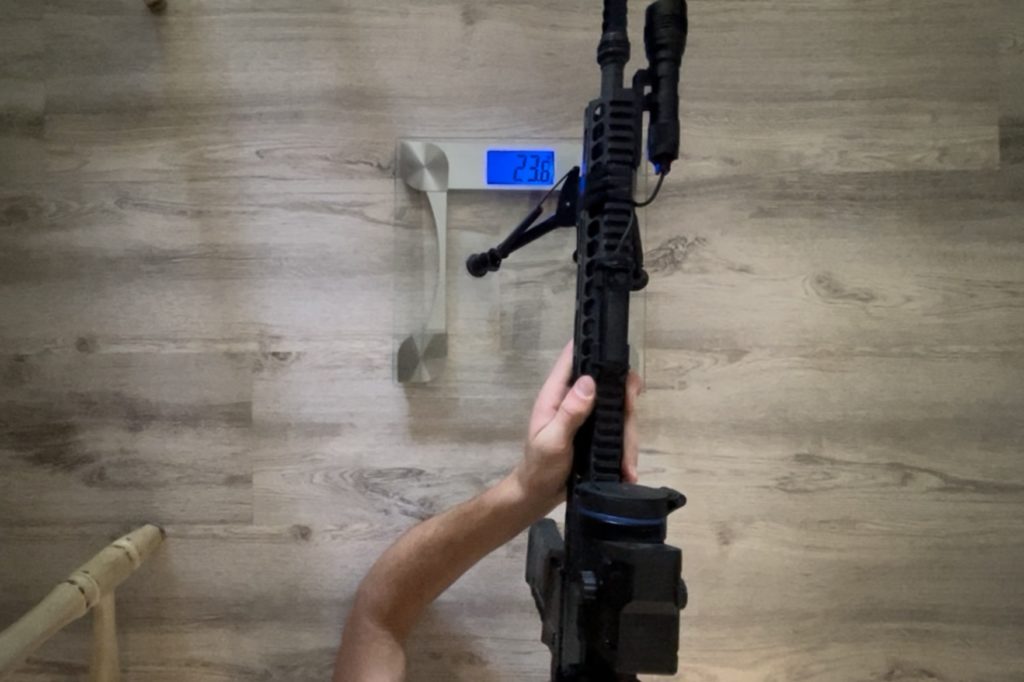
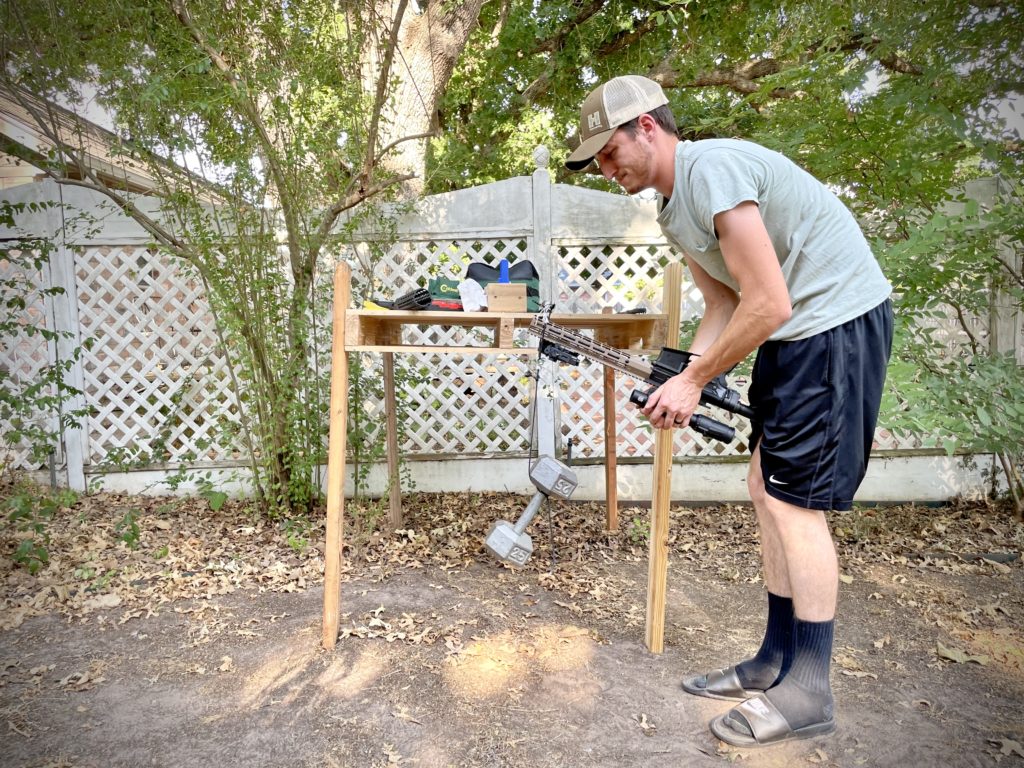
Trying to determine a reasonable load to apply for my test, I got out my hefty AR10, slapped a bipod on it, and set the bipod on a scale. I then leaned into the rifle and found that 23.6lbs was within reason for digging in and trying to hold steady. To make things easy, I grabbed a 25lb dumbbell (measured to be 25.04lbs) to use for this test. While I aimed to slightly exaggerate what downforce would be applied when shooting with a bipod, I believe the 25.04lbs used is totally within reason for heavier platforms.
Now for the test. The main portion of this experiment was to determine strictly the angle of slope created from deflection when the rail is under load. This is aimed to simulate anytime something touches the rail. From shooting with a bipod, resting on a barricade, or even simply using your support arm to hold the handguard; anytime something touches the rail, forces are applied that fractionally shift a laser from its intended zero. This shift increases with force and distance. The slope from deflection increases proportionally with the force applied and is squared with distance. So theoretically if the slope = 1 MOA at rail slot 10 with 10lbs hanging from it, the slope would = 2 MOA with 20lbs at slot 10. Alternatively, if the slope = 1 MOA at rail slot 10 with 10lbs, theoretically the slope would = 4 MOA if the 10lb weight was hung from rail slot 20 (these distances should be used from the beginning of the rail which is rail slot T14, not the first rail slot on the upper receiver). As a quick test, I used the LMT MPR rail and attached a 25lb weight at slots T24, T36, and T46 and had an MOA shift of .32, 2.28, and 5.56 respectively. Shown below is a graph to visualize how the distance a force is applied away from the beginning of a rail increases MOA shift:

For each rail tested, I attached my Eotech 1-10 scope at rail slot T4 on a Colt upper receiver, my Steiner DBAL D2 laser at slot T37, and a 25lb dumbbell hanging from rail slot T40 using paracord. I also used an 11.5” Faxon barrel to sit in the upper receiver through the course of this test. Following the manufacturer’s specified torque specs, I attached all the rails using the highest torque value given. I used an EPAuto 1/2 drive torque wrench for the barrel nuts and a Wheeler F.A.T. torque wrench for all the handguard fasteners. After properly torquing the rails onto the colt receiver, and mounting the scope and laser, I would dial the windage and elevation to perfectly align the crosshairs with the center of the laser from the bench setup exactly 25 yards from a paper target while on 10X magnification. Using a piece of paper, I would mark 4 locations to center the crosshairs on throughout this test at the 25-yard line. After verifying that the laser and scope were aligned, I would then proceed to hang the 25lb dumbbell from rail slot T40 and then verify the scope was pointing at the original sharpie mark. While looking through the scope to verify zero, I would have someone else mark the center of the laser beam which was now below my point of aim while the weight was hanging from the rail to measure the deflection. Then I would remove the weight and look to see if the laser returned to the center of the crosshairs on my scope or if it had shifted. If it had shifted I marked this shift with a pencil. All but one of the rails had no shift in zero from only hanging and removing the dumbbell, and the one rail that had a shift maintained that same change after the first time it was loaded (I blame this on not pre-loading the rail as I mention later). After checking for a possible shift in zero, I would then repeat this process three more times to get a total of 4 measurements. These four measurements are shown in the image below and represent how many inches the laser shifted at 25 yards (ignore the fifth row for now, I will discuss this more later). All testing was done in the shade with ambient temperatures between 95-100 degrees Fahrenheit.

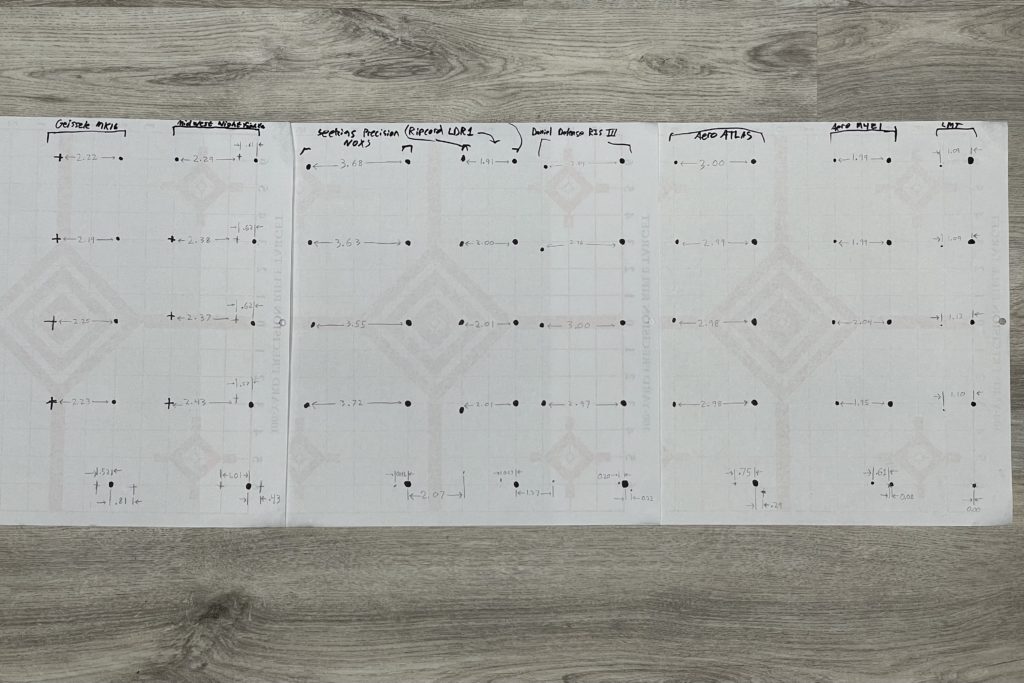
After gathering the data for the distance of laser shift for each of the rails, I was able to calculate an average MOA shift caused by 25lbs hanging from rail slot T40. I ranked the results below from the least to the greatest.
| Rail | MOA Shift |
| Seekins Precision SP3R V3 (with iRMT-3 Upper) | 4.39 |
| LMT MPR-L Quad | 4.40 |
| Aero Precision MOD 4 | 7.86 |
| Ripcord Industries LDR1 | 7.92 |
| Aero Precision Enhanced Gen 2 (with M4E1 Enhanced Upper) | 7.96 |
| Seekins Precision SP3R V3 | 8.58 |
| Geissele MK16 | 8.88 |
| Midwest Industries Nightfighter | 9.48 |
| BCM MCMR | 11.46 |
| Daniel Defense RIS III | 11.76 |
| Aero Precision ATLAS R-ONE | 11.96 |
| Seekins Precision NOXS | 14.60 |
MOA shift when a 25lb dumbbell was hung from rail slot T40
Before conducting this test, I highly suspected the LMT Monolithic Rail Platform (MRP™) to perform the best in this portion of the experiment. Unlike all of the other rails, this upper is milled from a single piece of aerospace aluminum forging. As I anticipated, this increased the rigidity and got rid of the problem of a rail walking around on a barrel nut. However, this is an expensive upper, and I wanted to test a range of popular options to show people how their platforms really stack up. Much to my surprise, the Seekins Precision SP3R V3 had the least amount of deflection when paired with the Seekins iRMT-3 Upper. Not only did it perform nearly identically to the LMT single-piece system, but it also beat out all the other two-piece handguard/upper receiver systems by a significant margin. However, when I used this rail with a Colt upper like I did for all of the other rails, it was very comparable. Looks like proprietary uppers can make quite a difference. Similarly, the Aero Precision M4E1 upper receiver/rail combo uses a proprietary mounting system so I consider it, the Seekins, and the LMT MPR to be in their own unique category, while all of the other rails attach using a more traditional barrel nut and clamping attachment method. However, since these are all options on the market, I didn’t want to limit this test to any single mounting system.
Now, what do these numbers mean? Well, they mean that if you are resting on a bipod pushing down with 25lbs of force, then at 100 yards your laser or front sight post will be shifted up by a flexing rail causing your shots to shift between 4.4-14.6 inches if using one of these various rails and aiming with the front sight post or laser (if aiming with a scope attached to the upper receiver, there should be near zero MOA shift with a true free floated handguard).
In addition to a pure rigidity test, I also wanted to determine how well these various rails held zero when impact-type loads were applied. After using the first four dots on the paper for measuring deflection, I used the fifth to measure “extreme spread.” To get these values, I did two things. First, I would push down on the 25lb dumbbell when it was attached to rail slot T40 with 10 consecutive pushes while aiming to replicate chest compressions in CPR. Using a hanging weight scale, I measured this downforce to average approximately 80lbs. After these pushes, I removed the dumbbell from hanging on the rail and measured how far down the laser had shifted at 25 yards. After marking this value, I then took the AR, flipped it upside down, hung the 25lb dumbbell from rail slot T40 again, and jerked the AR up and down 10 times trying to bounce the weight hard from the ends of the rails. After this, I removed the weight, put the AR back in the table mount I made for the test, and measured how far up the laser had shifted. The distance from bottom to top is what I am calling “extreme spread” and can be seen as the markings around the bottom dot in each rail column shown below.
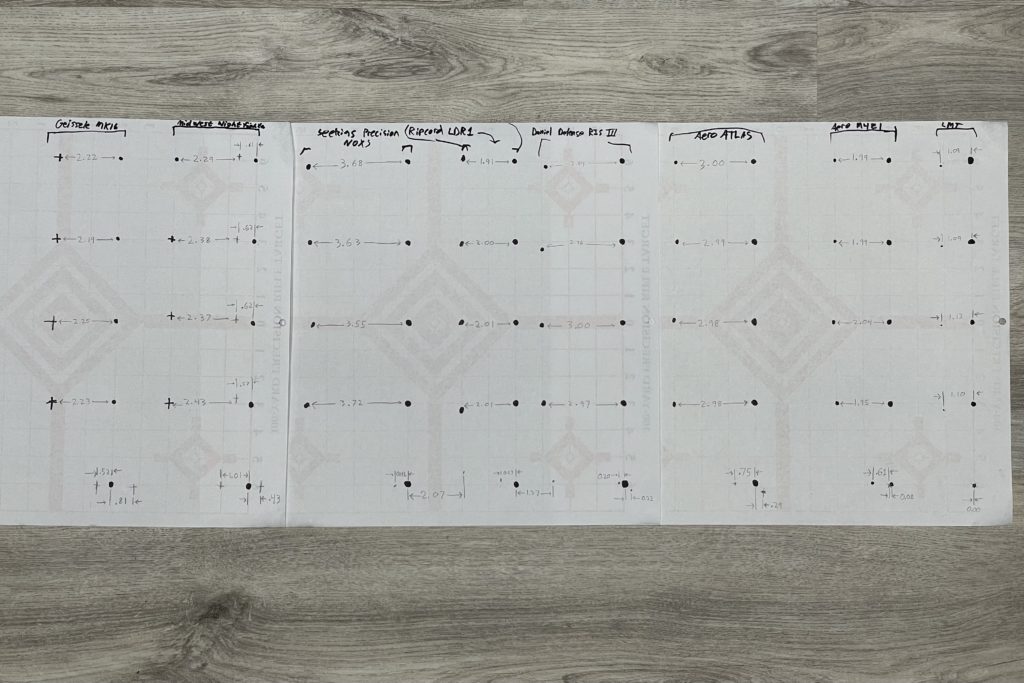

I am human and cannot perfectly apply equal forces using this method so the results from this part of the test should be taken with a grain of salt. While this portion of the test is not as quantifiable or repeatable as the first, I think it still provides valuable insight into what these rails are capable of, and how much play some of these systems have. Either way, shown below is a table from my results:
| Rail | Extreme Spread in MOA |
| LMT MPR-L Quad | 0.00 |
| Seekins Precision SP3R V3 (with iRMT-3 Upper) | 1.08 |
| Daniel Defense RIS III | 1.68 |
| Aero Precision Enhanced Gen 2 (with M4E1 Enhanced Upper) | 2.76 |
| Aero Precision ATLAS R-ONE | 4.16 |
| Aero Precision MOD 4 | 4.36 |
| Geissele MK16 | 5.32 |
| Midwest Industries Nightfighter | 5.76 |
| Ripcord Industries LDR1 | 7.76 |
| BCM MCMR | 9.75 |
| Seekins Precision NOXS | 10.12 |
| Seekins Precision SP3R V3 | 17.72 |
MOA shift of “Extreme Spread”
Previously testing rails, I also found out that they can sort of “walk” around on a barrel nut. If a sling mount is attached to one side of the rail and is always pulling to the left, the rail settles in torqued ever so slightly to the left. I found that if the rail is “pre-loaded” or pushed pretty hard multiple times in the direction it will actually be pushed against a barricade or slung, it holds zero much better. When “pre-loaded” or pushed to one side, I found that there was virtually no shift occurring with all of these rails when hanging a weight from them and then removing it. Each rail only deflected proportionally to the amount of force applied and bounced back to the original zero. However, the “extreme spread” is evident when beating the rail in opposite directions which I believe to come from the rails “walking” or slipping around on the barrel nut. The extreme spread would also come from physically bending or plastically deforming the rails, but I do not believe this occurred to any of the rails during my testing.
The results above in Table 2 represent a permanent shifting of zero whereas Table 1 showed how much shift occurred when under a constant load. As I expected, the LMT performed great and had zero MOA shift. If a shift would have occurred, this means that my test would have permanently bent the rail since it is a single-piece handguard/receiver. Surprisingly to me, the Daniel Defense RIS III held zero very well throughout the impact test for the short barrel nut it uses. Due specifically to the short barrel nut I had set a lower bar mentally, but was pleasantly surprised during this test to see it hardly shifted from its original zero. The Seekins Precision SP3R V3 paired with their proprietary iRMT-3 upper uses a unique triangle handguard which ended up providing the best return to zero of all two-piece rails I tested. Similarly, due to the affordability of the Aero Precision ATLAS and its slim overall profile, I underestimated its reliability. In reality, the ATLAS kicked butt in regards to performance per dollar.
As someone who has been curious about how rails rigidity comes into play for zero retention with IR lasers, I never found any answers. While this test did not include many other rails on the market, I worked with what I could get my hands on, and hope this test provides y’all with some helpful information. A lot of manufacturers market their rails as the most rigid and robust and charge a lot more for them. However, it turns out that even some of the more affordable options are great contenders. It also appears that rigidity is not the only factor in maintaining zero for rail-mounted aiming devices. Using a mounting system that mitigates “walking” is more complex but just as if not more vital than the actual rigidity of a rail. However, these do not necessarily go hand in hand with two-piece receiver/rail systems. The clear winner is the LMT MPR. They were really on to something when they designed their Monolithic Rail Platform, and it does what it was intended to do.
So what useful information can we take from this test? First and foremost, aiming with optics mounted to the receiver is the way to go in terms of maintaining a true zero. Rail rigidity when not using a rail-mounted laser or front sight post doesn’t matter at all in terms of functionality. However, using a laser to aim while applying a force to the rail will cause a point of impact shift. Ways to mitigate this shift are as follows:
- Decrease the amount of force used to rest a rifle on a bipod or barricade
- Apply the force as close to the handguard as possible
- Move lasers/front sight posts closer to the receiver when possible
- Use a consistent grip with your support hand when holding the handguard
- Things bend more in higher temperatures. This means there would be less shift in cold environments, and users may see more shift in the summer or after mag dumping and heating up the rail
- Before zeroing a rail-mounted laser or front sight post, “pre-load” or push up (or in the direction you anticipate applying a load in) on the rail multiple times to mitigate any effects of the rails walking around on the barrel nut
- Zero your front sight post or laser using the same resting position as you intend to shoot with
Does rail rigidity matter? For most people, this is not a major factor to worry about. I enjoyed nerding out for this experiment, but never really shoot long distances with iron sights while using a bipod, or shoot past 75 yards at night using an IR laser. The extreme spread and MOA shifts I measured are fairly large, but the user’s end goals and needed precision dictate everything. These shifts were also intended to be exaggerated by using a 25lb dumbbell from the furthest rail slot on shorter rail systems. Applying less weight would dramatically decrease the actual shift, but using a longer rail on full-length rifles could exasperate it. Precision is a major aspect of shooting and should be sought after. Knowledge is power, so take from this test what you will.
***Buy and Sell on GunsAmerica! All Local Sales are FREE!***



Mitchell
Have you done any flex testing on the JP Rifles MK3 RCS handguard system?
Thank you
I’m curious if you would add onto this list the Geissele Mk4/Mk8. The Mk4/Mk8 use a longer barrel nut and have more material than the Mk16. Would it produce less deflection
Wonder how much difference there would be with a full length rail under the handguard?
I’m inclined to agree that the 25lb force should have been applied upward rather than downward. The deflection might not be the same because of the rail abutment surfaces. The picatinny rail section at the rear of the handguard contacts the corresponding rail surface at the front of the upper receiver. There is no such contact surface on the bottom of the rail or receiver.
Being that the LMT MPR is solid throughout and all the rest were M-Lock style handguards which obviously make then less stable, I wonder what the same tests would show for the Key-Lock style handguards as it seems to have more material for support that would counter more flexing forces. What do you think?
This was an excellent test to conduct! As an engineer myself, I often questioned the stiffness of these rails and how it affects sights. Also note that the deflection of a cantilevered beam is exponential; the closer to the receiver on the guard you mount a laser or sight, the deflection when loaded decreases exponentially. In other words, as the sight is moved closer to the receiver, the deflection when loaded will eventually become insignificant. What’s insignificant depends on what one considers acceptable, and of course the sight, range, etc. as well. Thanks for doing this test.
You turned the paper 180 degrees, not 90 degrees. You stated; “left, right” If you turned the paper 90 degrees, you should have said “UP and DOWN.
Second; You pulled DOWN on the handguard. When shooting, the pressure is applied UPWARD.
You left out a good handguard; made or sold by Stag.
Otherwise a very good commentary or experiment.
He turned it 90 degrees.
As far the force being applied down, the deflection up would be the same absolute number, since the moment of inertia about the horizontal axis is the same.
However, the section modulus could be different about the horizontal axis, based on their shape. Thus, the compression stress would not be equal to the tension stress (and vice versa when loaded the opposite direction), but that doesn’t affect the deflection, only the stresses. However again, some Aluminum alloys have different yield and ultimate tension & compression stresses. Unless 25lb causes one of the rails to yield (I hope not, as that doesn’t seem like a lot of force), then this is a digression…