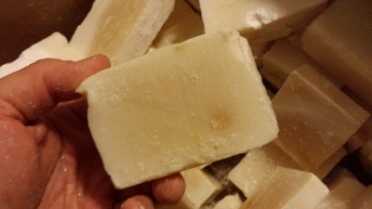
This is a batch of soap that I made about 6 months ago. It has dwindled because of neighbors and friends who always want another bar.
Resources:
SoapCalc Recipe Calculator
https://www.soapcalc.net/calc/SoapCalcWP.asp
The Bulk Apothecary
Lye, Coconut Oil, Sweet Almond Oil, Palm Oil, Essential Oils
Liberty Natural (Essential Oils): https://www.libertynatural.com/
Soap Molds On Ebay
In a survival situation you can’t take anything for granted. Cleanliness is absolutely required, and soap is something you already should be storing in decent quantities. You don’t have to make it yourself, but I just realized that I might as well share how to do it. I’ve been making soap for over a decade and my only warning about making soap is that if you plan to give some to your friends and family, don’t, unless you want to start a free soap business. Homemade, cold process soap made from vegetable oils will eliminate most dry skin issues, and used as shampoo, it will do away with the need for dandruff shampoo. Believe it or not, I’ve even had reports from friends that it gets rid of hemorrhoids. Soap is an interesting product because you aren’t allowed to advertise it with any health claims, but suffice it to say that store bought soap just isn’t the same as homemade.
To be clear (no pun intended), we are not talking about “melt and pour” soap. Your local health food store will have a shelf full of nifty smelling and looking soaps that are made from melted glycerine. Glycerine is a by product of commercial soap production, and many people find it much nicer to use than regular store bought soap. The problem with glycerine soap is that it doesn’t foam very well or clean very well, which are the strong points of regular bars. The natural food stores don’t carry a lot of the soap you can make at home because for one it expensive to make, and it also can spoil, though I have never seen this happen even after storing soap blocks for many years.
Cold process soap is made with common vegetable oils, water, and “lye.” What is lye? Drain cleaner, otherwise known as NaOH, or sodium hydroxide. You can’t actually buy drain cleaner anymore that is pure sodium hydroxide. The last brand was Red Devil, but I don’t see it for sale anymore. Fortunately you can order pure sodium hydroxide online from The Bulk Apothecary, which is also a source of the oils that you can’t find at the supermarket. The web is full of soapmaking suppliers, but many of them are small companies and the order doesn’t come in for ages. I have had good experiences with The Bulk Apothecary.
If this was ten years ago when I learned how to make soap, I would be directing you to buy one of two or three decent books that were written decades ago on the subject of soapmaking. These days you don’t have to buy any books. There is a website called SoapCalc.com that will calculate you a custom recipe. Then you can do any level of learning and research as to where to go from there, if you choose, but none of that is required to make a simple batch of soap beyond what I have explained for you here.
You will see that my recipes are very large. 12 pounds of oils will give you a pretty big block of soap, approximately 80 regular sized bars. Below there are detailed instructions about the soapcalc recipe, but lets start with what you need to get your first batch going.

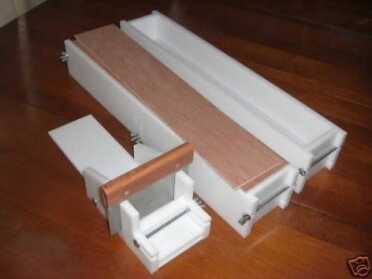
These soap molds are sold on Ebay for $80 including the cutter system. My sample batch needs 4 of these molds. You can also just use a cardboard box or boxes lined with trashbags.
- 2 plastic or stainless mixing buckets or pails – This recipe fills a 5 gallon bucket about half way.
- 1 plastic or stainless mixing spoon. – Kitchen supply.
- 1 long meat thermometer or electronic probe thermometer. – You have to measure the temp of the lye water.
- 1 or more molds. – If you want to spend money, this guy on Ebay has some good take apart molds I have used, and they come with a rudimentary cutter system. Otherwise you can use a heavy cardboard box, like a liquor bottle box, lined with a trash bag. Don’t use a plastic bucket or tub unless you plan to cut the plastic away. Soap sticks! Cardboard works and has been used by home soapers for decades.
- 1 home kitchen scale, electronic. – A 10lb scale is better but you can get by with a 5lb scale.
- 1 large plastic food sized container. – To weigh the sodium hydroxide.
- 1 blanket – To cover the soap for the first day.
- Distilled water. – Even if you don’t have hard water use bottled distilled.
- Safety goggles and gloves. – Sodium hydroxide mixed with water is nasty stuff and a splash can blind or burn you. Don’t mess with this precaution accidents always happen when you are dumping these large quantities into each other.
- Vinegar – IMPORTANT! – This is used to neutralize accidents with the lye. Keep it in arms reach at all times.
- Baking paper – (optional) if you use the “linerless” molds, line them anyway because the soap can be tough to get out.
- Scent – (optional) Essential oils are the only things that don’t break down in the lye. I have successfully used Peppermint, Lavender and Bergamot oils. Don’t ruin your batch by trying smells made for glycerine soap. The lye eats them.
And that’s it folks. Before I get into the specifics of my example recipe, I will explain just how simple this is.
Basic Instructions:
- Weigh, do not measure, your oils on a home kitchen scale. My fairly large sample recipe has 5lbs of olive oil, which is the one oil you can easily get at the supermarket. Your olive oil can be the cheapest at Walmart. Don’t spend the extra money on extra virgin. Even oxidized oils are fine for soap. The oils can all be mixed in one of the two buckets.
- Weigh, do not measure, your sodium hydroxide into a plastic container.
- Weigh or measure your distilled water into the second large bucket. If you measure, be as precise as possible, and make sure your math is correct. Measured and weighed ounces of water are the same, but the math can get you.
- Carefully, and slowly, OUTSIDE, pour the sodium hydroxide into the water, being careful not to get any splashes on you. WARNING! DON’T BREATH THE FUMES. HOLD YOUR BREATH WHILE YOU POUR AND BRIEFLY STIR THE CONTENTS WITH YOUR LONG SPOON TO DISSOLVE THE GRANULES. THE MIXTURE WILL BE HOT.
- Wait for the mixture to cool to 100 degrees F. You can use a water bath for the bucket to speed it along, but beware that it works quickly. There are arguments as to the ideal temperature to make soap but I have always used 100 degrees.
- Pour the sodium hydroxide water into the bucket of oils, stirring as you go. Be careful not to get any on you. It is still very caustic at this point. Don’t be afraid of the warnings. Follow them and you’ll be fine. Just be aware that even after mixing we are dealing with nasty stuff here.
- Mix the soap until it “traces,” meaning that when you take some in the spoon and drizzle it back, it takes a second for the ripple to go down. It means that you have mixed it enough and the chemical reaction is taking place. Time to trace can be 15 minutes or an hour. Just keep stirring periodically at the very least, and make sure you get down into the corners of the bucket. I have also used an electric beater mixer, but you need a tray type of bucket so that the beaters reach the bottom. Use low speed.
- Add your fragrance as a last step and mix it in good. Some essential oils can speed up a trace quite a bit so beware that you might have to get moving.
- Pour the soap from the bucket into the lined mold.
- Cover the entire mold with a blanket for 24-48 hours.
- When it seems to have solidified you can cut the mold away or take apart your purchased mold(s)
- One week later you can cut the soap. Don’t worry about perfectly shaped bars unless you decide to buy a cutter system. A guitar string works great.
- When you cut the soap, lay it out on racks to dry. They don’t have to be actual metal racks. Cardboard works fine and the bars don’t stick.
- In about 6 weeks the bars will be totally cured. You can use one before then but it will feel slippery because of the alkaline PH.
The SoapCalc Recipe
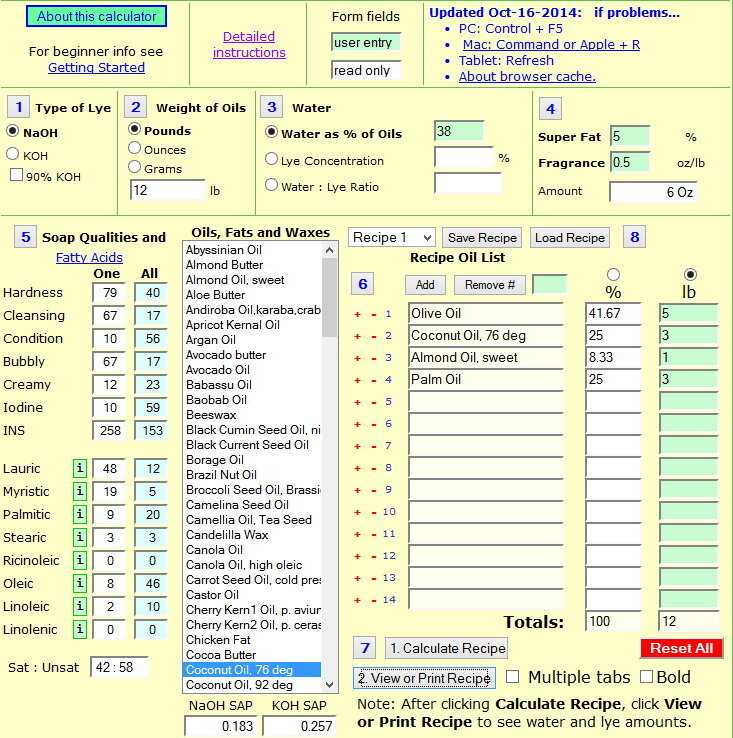
This looks really confusing but it isn’t. Your first action item is to enter how many pounds of oils you plan to use for this batch. I like to do 12lb batches because it is a lot of soap, but not too much that it is hard to cut. Then select your oils by either double clicking on them or hitting the “add” button. Olive oil and coconut oil will be mainstays in most soap recipes. I like palm oil and sweet almond oil because they add the other properties you want in soap without making things too complicated. I have found that soapcalc works great with straight oils, but if you want to add cocoa butter, shea butter, beeswax or other oddball ingredients the recipes need to be massaged somewhat. If you are going to try for something elaborate, it is better to make a small batch first.

Those properties that you see in #5 are the chemical variables that control the various properties of soap. The soapcalc website has a pretty good explanation of what does what, but see below that the final recipe also explains where your recipe is holding.
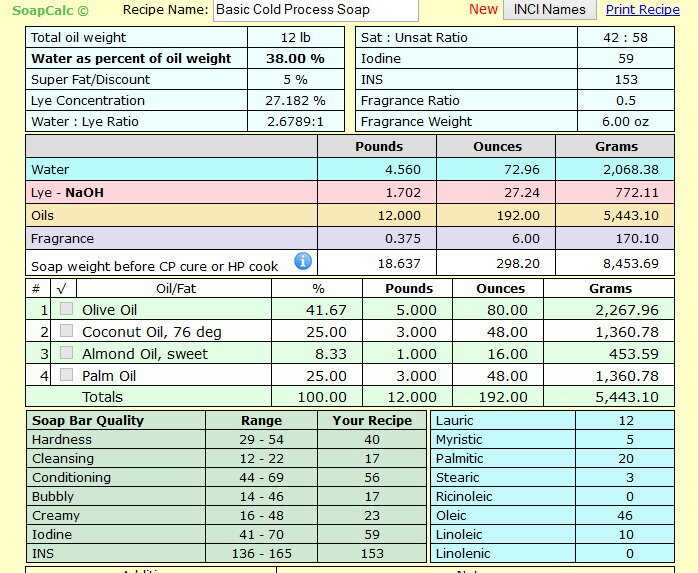
All of the other defaults can be left alone. Click Calculate Recipe, then View or Print Recipe. You’ll get this:

As you can see, it shows you the variables for how well it cleans, lathers, etc., and it is pretty easy to move your oil totals around to get what you want. Best of all, you have your lye and water amounts listed right there as well, in one printable page. Order your oils and NaOH and you’re ready to make soap!
Soap reaches back to as late as 2200 BCE. It is mentioned throughout history, and it has always been somewhat easy to make. You can use wood ashes for the lye, and you can render animal fat for the oil, if you want to go “old school.” In a survival life this may be required, but for now, I would go make some soap and store it. The blocks keep indefinitely and they are compact to store. Just beware that mice love to eat soap and it attracts them like flies to sugar. At some point maybe we’ll try some of the wood ashes soap, but I have read that it doesn’t harden like the soap you will make here.

Great Article, thanks for sharing with us
Can this be made and kept outside under freezing condition
That’s an awfully huge recipe for a first time or ‘sample’ batch. I’d cut that puppy in quarters, at a minimum, oil and fat-wise, and run it through SoapCalc again to get the correct amount of water and lye. Also lose the vinegar – in a lye spill onto your skin situation you want to flush with cold water, liberally. Vinegar not only won’t neutralize lye, it will cause an exothermic reaction that will actually make the burn worse.
If you freeze some of the water that you add the lye to the fumes are not as pronounced and the mixture will drop to 100 degrees faster. I have great success freezing say 1/2 of the water the adding the other 1/2 then adding the lye.
I would love to find a place that makes this kind of soap you describe that I can order from…. I do not have the time to make soap myself but would definitely be interested in buying a stash to start out with for storage..
There is a lot of handmade soap for sale on E-Bay but most of it is pricey. Make sure its cold process and not melt and pour soap that you are buying. Homemade soap is without equal.
If U want a hobby and more work to, make soap
If U want to “prep”, buy a cace of Dr Boners liquid soap!
I like baby mild, foe shampoo and body soap. Onlt take a
tablespoon full or so Nd a bottle last a lonr time.
Thank you grate article!.I remember making soap with my gram maw as a little boy,at hog killin time,.we killed the hogs, and cooked out the fat in a big wash pot, and some of it was used to make soap.