Estimated reading time: 15 minutes
The FLUX Raider X is, as of this writing, the latest expansion of the Flux Defense PDW chassis lineup. Utilizing this P320 chassis will give you one of the most compact and versatile PDWs on the market.
Raider X Review: Table of contents
Flux Raider X P320 Chassis
Preface
My first introduction to FLUX and the PDW concept was through a Brass Facts video I saw a few years ago. The idea didn’t gain much traction with me then but over time I began to see the practicality of a PDW. When the Raider X was released it seemed to be the perfect time to try one for myself. I contacted FLUX, and they were happy to loan me one for review.
PDW Concept and Use Case
To best see the purpose of a weapon like this it helps to understand the PDW concept as a whole. PDW simply stands for Personal Defense Weapon. Like most acronyms, breaking it down gives us only the most broad idea of its meaning. To be more specific, a PDW is a firearm that gives the user more capability than a handgun but without being so much larger than a handgun that it is not in some way concealable.
PDWs are the step between your EDC pistol and fighting rifle. The benefit of the PDW is its increased effectiveness over the pistol, with only a marginal size increase. Whether there is civil unrest in your city or you just have to go to the bad part of town, having a PDW gives you the option to carry something more effective than a pistol while not drawing extra attention to yourself.
An accessory you mount your handgun into, like the Flux SIG P320 Chassis and others like it, is one way to rig up a de facto PDW.

General wisdom says to avoid sketchy situations but when they can’t be avoided, discreteness is key. Stick plates under your shirt, a concealed carry pistol, and a PDW slung under a jacket draw a lot less attention than a Tactical Tommy with his rifle and full kit. By letting your weapon go unnoticed, you avoid being seen as a threat, or worse, a target.
It might be strange to think about carrying a PDW, but I am convinced that, for defensive purposes at least, a PDW is more useful than an AR-15 for the majority of us. We have all thought about our fighting rifles in terms of SHTF or that “just in case” scenario, but realistically, things rarely get bad enough to warrant their use. It is far more likely for a situation to dictate a discrete PDW than a fighting rifle.
Raider X First Look
As I unboxed my new P320 chassis, the first thing that caught my attention was the chassis rigidity and overall feel of quality. From the grip texture to the smoothness of the mag release, everything feels well-engineered, executed, and fitted.
Assembling the Raider X
Fitting my Sig P320 into the Raider X couldn’t have been easier. I removed the slide and FCU from the P320 and then installed the FCU in the Raider. After that, the slide slid right on, and I was done. The entire process took less than five minutes.
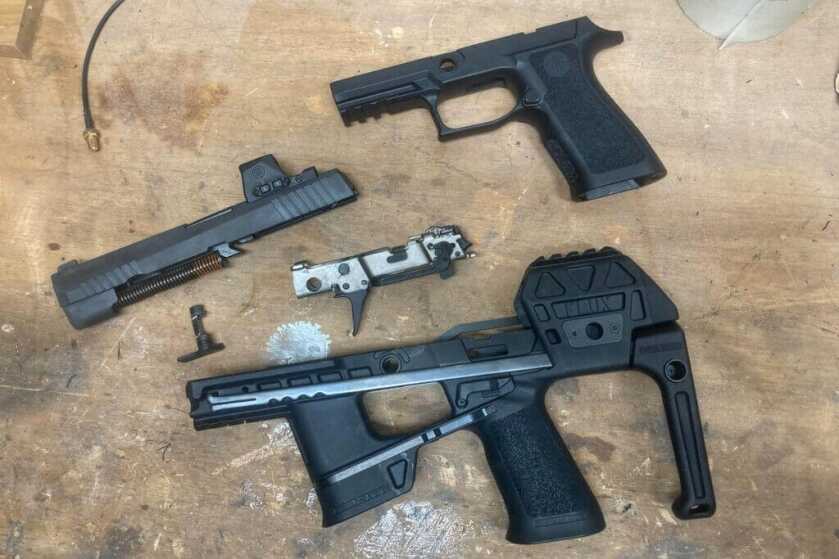
I used a SIG P320 BXR3, but any full-size P320 without a manual safety will work (with this P320 chassis; if you use a different model or brand, you will want to double-check for suitable fitment). Compact P320s will also work in the chassis but it is not recommended to use those unless you are running a flash hider or suppressor. Without either of those devices, your hand would be dangerously close to the muzzle.
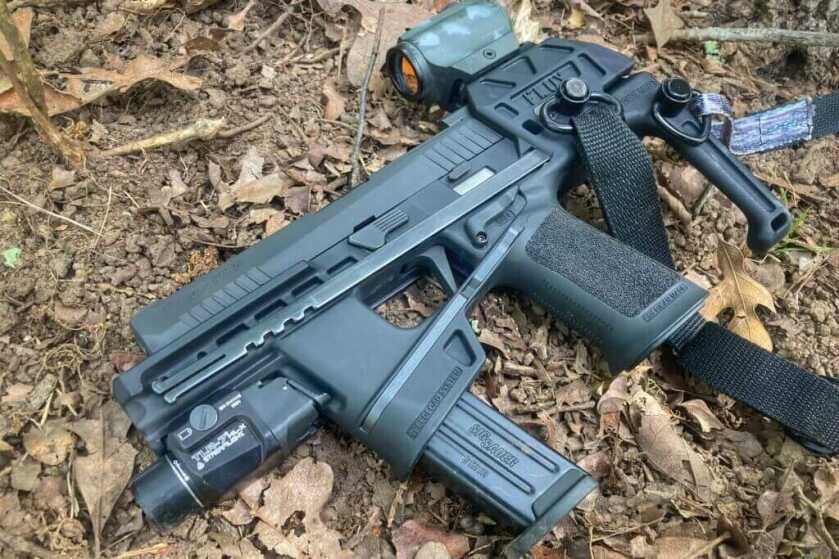
Mounting Optics
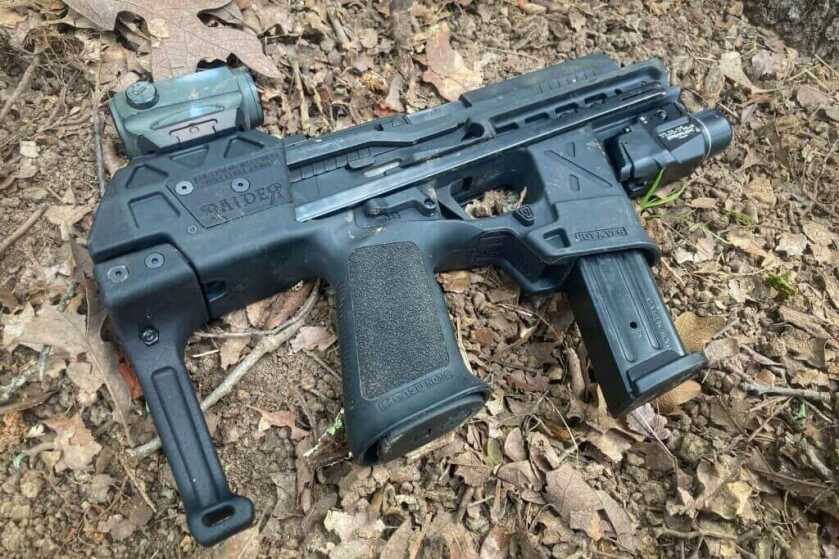
The Raider X features a four-slot section of Picatinny rail near the rear of the frame for mounting optics. I chose to mount a Holosun HS403B, but any number of red dots would work.

This red dot sits at the perfect height for me, even without a riser. My cheek rides against the telescoping arms of the brace and my head stays upright as I view the dot through the optic. It sits high enough that I can even get a sight picture while wearing a dirtbike helmet; although I would probably add a riser if I planned on shooting with a helmet more often.
The Brace On The Raider X
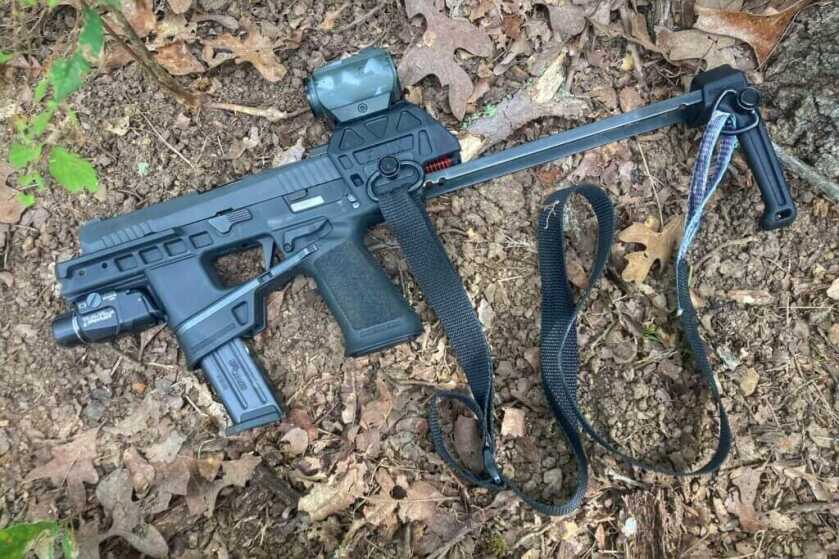
The most recognizable feature of the Raider is its quick-deploy brace. With the manipulation of a single lever, a brace shoots from the rear of the chassis like a stiletto and locks itself into place.
This is my favorite feature mainly because it is so fun. I can’t pick this gun up without popping the brace out a couple of times. It has a type of James Bond feel that hasn’t gotten old even after hundreds of times.
In addition to making me feel like a secret agent, the brace’s function is also practical. The release lever is located just below the ejection port above the trigger guard. This is the perfect position to be manipulated by your trigger finger as you present the weapon.
I have found the ability to deploy the brace one-handed to be a big plus. It cuts time as I pick up the gun and get it on target. Because the brace extension can happen on its own as I raise the weapon there is no need for a separate operation.
Mounting Accessories
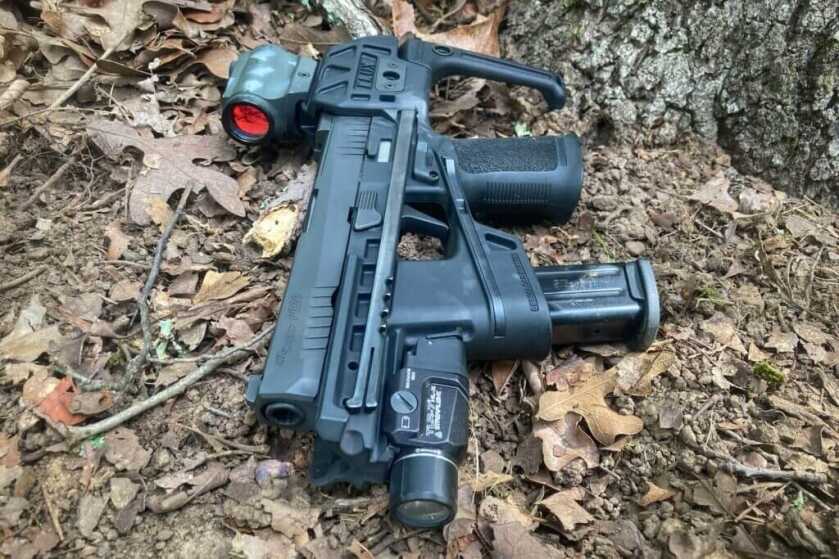
This unit features one forward accessory rail located under the muzzle in the six-o-clock position. Most any light will fit here but longer lights will stick out past the frame adding to the overall length of the gun. With compactness being the whole purpose of this weapon, I decided to mount a TLR-7® HL-X USB. This light is slim and compact yet produces 1000 lumens and 22000 candela.
Rail sections can also be added to the three-o-clock and nine-o-clock positions. These would be good to mount an IR laser if you wanted to use this gun with night vision but keeping it as slim as possible will serve my needs better so I left them off.
There are two quick-detach sling mounting points integrated into the Raider X. Both are on the left side, one is between the grip and optic mount on the frame and the other is on the brace. Lots of people run single-point sling with these because they are so small but I prefer a lightweight two-point that utilizes both QD points. I prefer this setup because you can keep the sling nice and tight for carry then when you activate the stock it effectively adds ten inches to the sling allowing you more range of movement.
Forward Mag Well
The second unique feature of the Raider is the spare mag well. While I am normally not a fan of mag carriers that attach your spare to the gun itself, I like how it was executed on the Raider. Plus, having extra ammo contained within the one package does fit with the PDW use case.
Shorter than the main magwell, the spare will hold a variety of mags but even the shortest will protrude a couple of inches. While not technically a grip, the protruding mag does provide a good place for your support hand.

The mag release for the spare mag is well thought out, to say the least. It is located under the trigger guard just behind the spare mag. This is a prime location to be actuated by the thumb of the support hand as it grabs the spare. A half-press releases the spare and a full-press releases both the spare and the primary simultaneously.
The dual-function mag release makes for a unique reloading experience and can be quite fast with practice.
Raider X Controls
In addition to the dual-purpose mag release, there is also a release for the primary mag in the typical location: the left side of the grip, accessible by the right-hand thumb. Finally, there is a THIRD primary mag release forward of the trigger guard on the right side of the frame. Although accessible by my trigger finger, I don’t think I have ever used this release. The other two have just proven to be more intuitive.
As I have already mentioned, the brace is deployed by depressing the lever on the right side of the frame near the ejection port. The same lever is depressed to unlock the stock from the extended position so it can be stowed.
Another great feature is the manual safety. I avoid manual safeties on most handguns but since this is not carried in a holster a manual safety is a must. The switch is located in a good position and is easily accessible by my thumb. The safety has a good feel as it snaps firmly from safe to fire and back again.
At The Range With the Raider X
I had always assumed that the Raider would be more effective than my G19 but the question is if it offers enough of an advantage to warrant the additional cost, size, and weight.
To test this I experimented by comparing my G19 to the FLUX Raider X across six different courses of fire. All drills were performed cold. Targets are 7”x9”. Here are my results.
1. First Round On Target
Starting with the weapon holstered or slung, put one round on target from ten yards. G19 averaged 1.41s and the Raider averaged 1.85s. This result is about what I expected. Finding the grip on a gun slung to your side is a lot less consistent than one that is in a holster.

2. Recoil Control
Starting from low ready, put five shots on target from ten yards. The averages were 2.24s for the G19 and 1.32s for the Raider. Here we start to see the advantage that comes with a brace. With the improved recoil control of the braced Raider, I was able to keep the dot on target and let my finger run.
3. One Handed Recoil Control
Starting at low ready, put five rounds on target from ten yards using only one hand. G19 averaged 4.9s and the Raider averaged 3.05s. Once again the braced PDW helped me put rounds on target more quickly than the standard pistol. I think this sheds light on another use case for the Raider. I would prefer the Raider hands down any time a one-handed operation is likely, maybe carrying children or managing a crowd. The brace gave me the second point of contact needed to get on target quickly and handle the recoil.
4. Transitions
To practice transitions I set up two targets five yards apart and engaged them from ten yards. I would shoot four rounds switching targets between each shot. The averages were 3.15s for the G19 and 2.25s for the Raider. I found that the Raider was faster to transition since it was tucked in close to my body and moved more rapidly than the pistol held at arm’s length.
5. Reload
Next, from ten yards I would put one round on target, do a slide lock reload, and put a second round on the same target. The G19 averaged 2.8s and the Raider averaged 3s. This result was the most unexpected of the bunch. I thought the raider with Its onboard spare would surely beat out my reload from the belt. I chalked this one up to inexperience as I haven’t practiced reloads with the Raider nearly as much as I have with my G19.
6. Consistency At Distance
Finally, To test at a bit longer range I backed up to thirty yards, started at low ready then put three rounds on target. The averages were 2.82s for the G19 and 2.08s for the Raider. As expected, the added stability of the brace continued to be beneficial.

To put it simply, the Raider is more controllable. This comes in handy for fast follow-up shots, shooting at a distance, and target transitions. Downsides include a slower first round on target when you have it slung to your side and reload which takes some specialized practice to master.
Additional Benefits
As I spend time with the Raider I continue to find new benefits of having a small gun like this. First, it is easy to travel with. Normally, when I travel, I just toss a few extra mags for my G19 into my backpack. Unless I am going somewhere where I plan on hunting or shooting I usually don’t bring a rifle since it’s a hassle lugging it around hotels and I don’t want to leave it in the car. The Raider is small enough to be tucked away inside my normal backpack and still adds a lot of capability.
On that same note, flying is much easier with the Raider. It can fit into a pistol case within your luggage so it removes the headache of checking a dedicated rifle case.

Second, I like to carry it while riding my dirt bike. Not having to wear a gun belt to support my pistol rig frees up my hips for better movement, and the Raider slung under my arm is less likely to snag on brush than a pistol on my hip.
Finally, It makes a good truck gun. For people who leave a weapon in their vehicle, I think this is a good option because it can fit in the glove box. This is faster to access than a rifle under your back seat and most glove boxes can be locked so you can better secure your gun when not in the vehicle.
Final Thoughts On the Raider X
As I am sure you can tell by now, I have become quite a fan of the Flux Raider X. It does well to fill the role of a PDW and for a comparatively good price. The Raider X chassis currently retails for $540. That plus the cost of a P320 is still well under the $2400 B&T TP9, which is one of the Raider’s most comparable competitors.
The raider is one of the best ways to dip your toe into the world of PDWs. It is a satisfying blend of fun and practicality that I have found with few other weapons.
Additional Reading and References
- Visit the FLUX Defense website for more information on the Flux Raider X P320 Chassis
- Turn Your P320 into an SBR: Flux Raider — SHOT Show 2023
- Check out the B&T USW-G Glock Chassis for some comparison
- Check out what Wikipedia has to say about Personal Defense Weapons
- Watch 9-Hole Reviews explain four types of PDW
*** Buy and Sell on GunsAmerica! ***

Garrett has a wide variety of skills and interests. His profession as an engineer in the steel industry aligns with his active approach to hobbies. Whether going to the gym, shooting, hunting, riding his motorcycle, or just tinkering in the shop, Garrett always strives to be his best.
Experience:
Mechanical Engineer – Supervises a small group of reliability professionals who deliver practical solutions and keep the plant running.
Practical Shooting – Former member of Oklahoma State’s Practical Shooting Team, and continues to hold himself to a high standard in defensive shooting.
Adventurer – Hiking, moto camping, backpacking, hunting, shooting. Life is too short to take it easy. Garrett is always looking for the next opportunity to get outdoors.
Why isn’t this an SBR as described in this other article?
https://www.gunsamerica.com/digest/turn-your-p320-into-an-sbr-flux-raider-shot-show-2023/
This model comes outfitted with an arm brace. Flux also makes a model with a stock that would be considered and SBR.
Thank you, Mr. Negen. However, in your article you refer to the arm brace four times as a stock. It sure looks like the stock in the other article.
Thanks for the heads up. I didn’t realize I had used them interchangeably.